How to Use LinkedIn to Grow Your Personal Brand and Scale Your B2B Company
By Starling Social President, Alyson Shane
The key to success in business is trust. After all, people want to work with, and buy from, people who they know, like and trust - and LinkedIn is the best platform for business-to-business (B2B) brands to reinforce those connections.
LinkedIn is also the best place for the people who run B2B businesses to grow their personal brands and reinforce their values and showcase the work they do to their communities.
In this post we’re going to be covering both of these topics: how to grow your personal brand, and scale up your B2B company, on this important and powerful platform.
Let’s start with the basics:
What’s a Personal Brand?
Let’s start with the basics: a “personal brand” is exactly what it sounds like!
Your “personal brand” is an extension of who you are. I love this description from Sprout Social that states: it’s the process of defining and promoting what you stand for as an individual.
When people think about you or speak about you, it’s your personal brand that they’re talking about, so it’s important to define what makes you, you.
Some questions you can ask yourself include:
- What are my values and how do I express them?
- What do I want to be known for?
- What’s my area of expertise and how can I share what I know?
- What makes me unique and sets me apart from others in my industry?
Once you’ve hammered out some answers to these questions, it’s time to start thinking about how to apply them to your LinkedIn presence.
How to Use LinkedIn to Grow Your Personal Brand
Let’s start with some actionable steps to level-up your personal brand on the platform:
1. Optimize your LinkedIn profile
Your profile is often the first thing people see when they find you on the platform, so this is an important first step.
Basically, you want your profile to showcase who you are, what you do, and why people should connect with you at-a-glance.
Here are a few things to keep in mind:
- Use a square, professional picture. Make sure the image aspect ratio is 400 x 400 px (pixels) wide. It should clearly show your face and, ideally, not be a selfie.
- You also have the option to post a profile video, but these are limited to 30 seconds so make sure to make them count!
- Use your background image strategically. This is prime real estate, so something related to what you do, your business’ brand, or something similar is ideal here.
- A headline that showcases your skills, and what makes you unique. This is the first thing most people will see, so make it memorable if you can! Here’s an example of what mine looks like:

- Hashtags that mention what you do. These are debatable (I don’t like using them, personally) but experiment and see what works for you!
- Links to relevant works in the Featured section. This could be places you’ve been published, your own published work (I do this a lot) or your resume, if you’re looking for work.
- Make the most of your “About” section. Spend some time writing an engaging description of who you are and what you do. This area gives you the opportunity to dig into what’s in your headline, preemptively answer questions, and expand on the unique skills and experience you bring to the table. Here’s what mine looks like:

Protip: take your personal branding a step further by customizing your LinkedIn URL. This can help you stand out in search results for your name and looks more professional than the generic URL LinkedIn generates for you. Here’s what mine looks like:

See? Short, snappy, and highly personalized!
2. Build Your Network + Start Engaging
Once you’ve got your profile properly set up, it’s time to start making connections and growing your network. To get started, focus on sending connection invites to people like:
- Friends
- Current and former colleagues
- Old classmates
- Industry leaders you respect
- Vendors you’ve worked with
- Other professionals in your city and network
That being said, when connecting with people on LinkedIn, there are some “best practices” to keep in mind:
- Personalize your connection request. You don’t have to do this, but taking an extra minute or two to write a short message explaining why you want to connect helps “humanize” your request and can make it look less spammy.
- Start with people you already know. Before you start trying to connect with friends-of-friends, focus on building a strong network of people you already know, like, trust, and respect. Then you can move onto making broader connections with other people in their networks and your industry.
- Join relevant LinkedIn groups. If you’re looking to connect with other people in your industry and “tap into” expertise on the platform, then Groups are the way to go. There are a few “ground rules” to follow, however:
- Spend some time in the group before engaging. This will help you know if it’s the right fit for your goals, and help you avoid looking like you joined the group just to spam everyone.
- Share relevant content and post useful, helpful comments. Remember: you’re not in a group to sell; you’re there to learn and be part of a community.
- Do not go heavy-handed on promoting yourself. Groups are communities of like-minded people and over-promoting yourself can come across the wrong way.
- Engage with your connections. This is a no-brainer; spend time on the platform every day (Monday - Friday, anyway) leaving thoughtful, supportive, and insightful comments. Over time, others will see the way you interact and hopefully want to connect with you, too.
Important: Never Lead With a Personal Ask or Pitch
I mean it. Don’t do this in a comment, or in a DM, or anywhere.
Leading with an “ask” or a pitch feels slimy, because it is. It shows that you don’t actually value the person or the connection; all you’re out for is to benefit yourself, and that rubs people the wrong way and can sour the relationship from the get-go.
If you want to work with someone or pitch them on a service, you need to spend time getting to know them first and, eventually, message them and focus on how you can provide value for them.
3. Start Creating and Sharing Content
Now comes the fun part: creating content to share with your connections!
LinkedIn offers lots of ways to showcase what you know and highlight what you do, including single-image posts, carousels, videos, and even newsletters.
Regularly sharing content on LinkedIn reinforces you as a subject matter expert, and helps you build a reputation as a go-to source for insights and information about your industry. The more you publish, the more credibility you can build for your personal brand.
Of course, if you’re new to the platform then this is easier said than done. Here are a few topics to consider to help you get started:
Identify the Framework of Your Personal Brand
Let’s start with the basics. Consider things like:
- What do you want to accomplish with your personal brand?
- Which types of connections do you want to reach?
- Which topics are you passionate about?
- What’s your personal backstory?
Be as specific as possible in answering these questions, since they’ll provide the foundation for your personal brand.
For reference, here’s what the framework for my personal brand looks like:
My mission is to empower others by de-mystifying the complicated world of digital marketing and content strategy.
My target audience are marketers and business owners who are too busy (or overwhelmed) to keep up-to-date on the latest strategies, and who might be looking to outsource their digital marketing to a team of experts (aka, me and my team).
To help them reach their goals, the topics I talk about are:
- Industry news and updates
- Social media tips and strategies
- Content marketing insights
- Business leadership and company culture
Sharing these kinds of updates positions me as a thought leader in my industry, and an expert that they feel they can trust to turn to when they need the services Starling Social offers.
The next step is to build out your personal backstory.
Of course, everyone is different brings a unique blend of skills and perspectives to the table, so I can’t really dedicate what your backstory should look like, but some things to consider include:
- How you got to where you are
- Unique experiences that shaped who you are
- Hands-on education and learning you’ve received
- Achievements you’ve earned
- How these elements help you bring a fresh take and expertise to the table
Don’t stress about nailing this right from the get-go; it’s normal to work to refine these stories over time, and over the course of multiple posts!
How to Use LinkedIn to Scale Your B2B Company
Let’s get into the nitty-gritty! Now that we’ve covered how to establish a presence on LinkedIn, it’s time to take what we’ve learned and apply it to scaling your B2B (business-to-business) company on the platform.
First Off: Why Use LinkedIn for B2B Marketing?
There are several reasons why you should be investing your time promoting your B2B company on LinkedIn, including:
Brand Awareness
Just like your personal brand, LinkedIn is a great place to magnify your company’s visibility and improve people’s perceptions of you and the work you do.
4 out of 5 LinkedIn users are in decision-making roles, meaning that a strong presence here can help them learn about your work, successes, and generate high-level brand awareness that can lead to future opportunities.
Lead Generation
Lead gen math is easy math: more leads = more opportunities for sales, and LinkedIn’s search filters make it super easy to identify potential leads in your target audience and develop personalized outreach campaigns to get them through the door.
Traffic Generation
Driving Traffic
Whether you’re driving traffic back to your website, or keeping your followers within the LinkedIn ecosystem by directing them to articles you’ve published on the platform, maintaining an active presence on LinkedIn can help get those eyeballs on the material you’ve worked so hard on.
This is also true for generating traffic to landing pages for campaigns you’re running, new product or service offerings, and anything else you want to promote.
Thought Leadership
It’s important to position yourself as a subject matter expert, but don’t sleep on the chance to reinforce your business’ expertise, unique value proposition (UVP), and the skills you bring to the table.
If potential leads see your company sharing relevant, interesting, and thought-provoking content, it reinforces the narrative that you’re at the bleeding edge of your industry and can move more leads through the pipeline.
This goes beyond just publishing your own posts, too. Make sure that your B2B brand is also answering questions “as” your brand in groups and on other people’s posts, too.
Strategies for Scaling Your B2B Brand on LinkedIn
Besides organic (unpaid) posting and replying in the comments section, there are several things you can do to elevate your B2B brand on the platform. Let’s explore a few:
Lead Gen Forms
Lead gen forms are exactly what they sound like: they’re lead generation forms that you can use to collect data without a landing page and amplify your sales efforts by connecting with people who are interested enough in what you offer to fill out a form.
LinkedIn Ads
This tip probably comes as no surprise to anyone. If you have an optimized business profile and are already posting organic content on a regular basis, then ads are a great way to amplify your reach and connect with an even wider target audience.
Be aware that LinkedIn ads are the most expensive type of advertising, so it’s important to be prepared and have all your campaign details (budget, timeline, targeting, goals, etc.) hammered out in advance.
LinkedIn Ad Campaign Groups
A “campaign group” is also exactly what it sounds like: it refers to groups of LinkedIn ad campaigns that you can manage at scale.
This approach isn’t something that’s widely discussed (I don’t know a lot of marketers who know about this feature, to be honest) but by placing related campaigns in the same “campaign group” you can:
- Set objectives that apply to all campaigns in the group
- Set budgets and schedules that apply to all campaigns in the group
- Manage the status of every campaign in the group in one place
- Review and export campaign metrics from the campaigns in the group
If you plan to run lots of different ad campaigns at once, this “protip” will make your life a million times easier, trust me!
Optimizing Your Company Page
We actually published a longer article about this back in late 2023 which you can find here, but here are some of the most important takeaways:
Schedule Your Posts in Advance
We’re big advocates of “batching content”, which refers to the process of creating a “batch” of content at once, then pre-scheduling it so you don’t have any gaps in your content schedule.
LinkedIn has a built-in scheduler, or you can use tools like Buffer or Sprout Social if you prefer to use a 3rd party option.
Follow Company Pages “As” Your Page
You can Follow company pages from your personal profile (and I encourage it) but a power move to generate more brand awareness for your business is to make a point to follow them “as” your company page, too.
This tactic adds greater viability for your Company Page, specifically, and encourages the people who manage the other Company Pages to follow you back, too.
Invite Your Connections to Follow Your Page
This is another one of my favourite B2B brand awareness tactics. You can use your personal profile to send invites to your connections to encourage them to follow your Company Page.
While this is an effective tactic, there are some basic ground rules to follow to not come across as spammy (which we don’t want):
- Don’t invite people you just connected with. Wait until they know you a bit better before making the “ask” of them.
- Send personalized invites when appropriate. This isn’t a hard-and-fast rule, but a little context and a personalized note makes people feel important and not like you’re just spamming them with invites.
- Re-up your invites as they happen. LinkedIn allows you to send up to 250 requests per month, and while that might seem like a lot it’s actually easy to hit the limit if you’ve got lots of connections. Luckily, as people accept your connection requests you “get” those invites back and can re-issue them to more people in your network, allowing you to exceed the 250 invite limit if your follow requests are accepted throughout the month.
These are just a few tactics available to you! Like I said above, you can dig into more strategies in this post about LinkedIn Company Page features you need to be using.
Start Making the Most Out of LinkedIn Today
We’ve covered a whole lot in this piece (it’s +2400 words, whoops!) so I hope this gives you a strong jumping-off point to start getting active and promoting yourself and your B2B business on this powerful platform.
If you’re looking for more insights to level-up your digital marketing knowledge, subscribe to our weekly newsletter which is jam-packed with the latest news and strategies.
Influencer Marketing in 2024: What You Need to Know
Raise your hand if your bank account has been personally victimized by influencer marketing.
Partnerships between brands and influencers are now more strategic than ever. It's not just about slapping your logo on their feed; it's about creating meaningful collaborations that resonate with their followers.
Our blog post will walk you through what influencer marketing looks like in 2024, how to find the right creator for your brand, how to set clear goals and expectations for a successful campaign and more.
What is Influencer Marketing
If you’re reading this blog, you probably have a pretty good idea of what influencer marketing is, but here’s a quick summary for the newbies.
Influencer marketing is when companies collaborate with popular social media personalities to promote their products or services. It's like getting your cool friend to recommend that new restaurant to you, but on a bigger scale. In 2024, the average person spends 2 hours and 24 minutes on social media per day, so it makes sense that this is a popular way to reach your target audience.
These influencers (or creators) have a loyal following who trust their opinions and recommendations. So, when they talk about a product or service, their followers are more likely to check it out and maybe even make a purchase.
The State of Influencer Marketing
It’s not really an exaggeration to say that everyone is on their phone all the time. Consumers make purchasing decisions because of that. New data shows that 81% of respondents have either researched, purchased or considered purchasing a product or service after seeing friends, family or influencers post about it.
73% of Gen Z look to creators when making purchase decisions, and 69% of consumers trust what influencers say and recommend.
Because it’s where people are spending their time, U.S. Brands are predicted to increase investments in influencer marketing in 2024 to 7.14 billion. Before you hop on the influencer marketing bandwagon, let’s dive into the details so you get the highest return on investment for your campaign.
Nano Influencers Are Thriving
Bigger isn’t always better when it comes to influencer marketing anymore.
People know when they’re being sold to when they see a sponsored product from a social media celebrity. The days of perfectly curated feeds are dead. Your audience craves authenticity. And this is a great thing! It’s mutually beneficial for the audience and the creator because real content fosters stronger bonds between influencers and their audience, enabling influencers to build trust gradually. This trust, in turn, boosts engagement, and when brands collaborate with these influencers, they inherit that trust.
Nano influencers, with smaller but highly engaged followings, are proving to be more effective in reaching niche audiences than their macro counterparts.
Here's where the familiarity principle kicks in: people are naturally drawn to what feels familiar and relatable. When brands partner with nano influencers, they tap into this principle, connecting with audiences on a personal level.
Wait, What’s a Nano Influencer?
There are five tiers of influencers. Not every agency agrees on the exact number, but the consensus is in this ballpark. Understanding the differences between each tier helps brands create targeted and budget-friendly influencer strategies that match their goals.
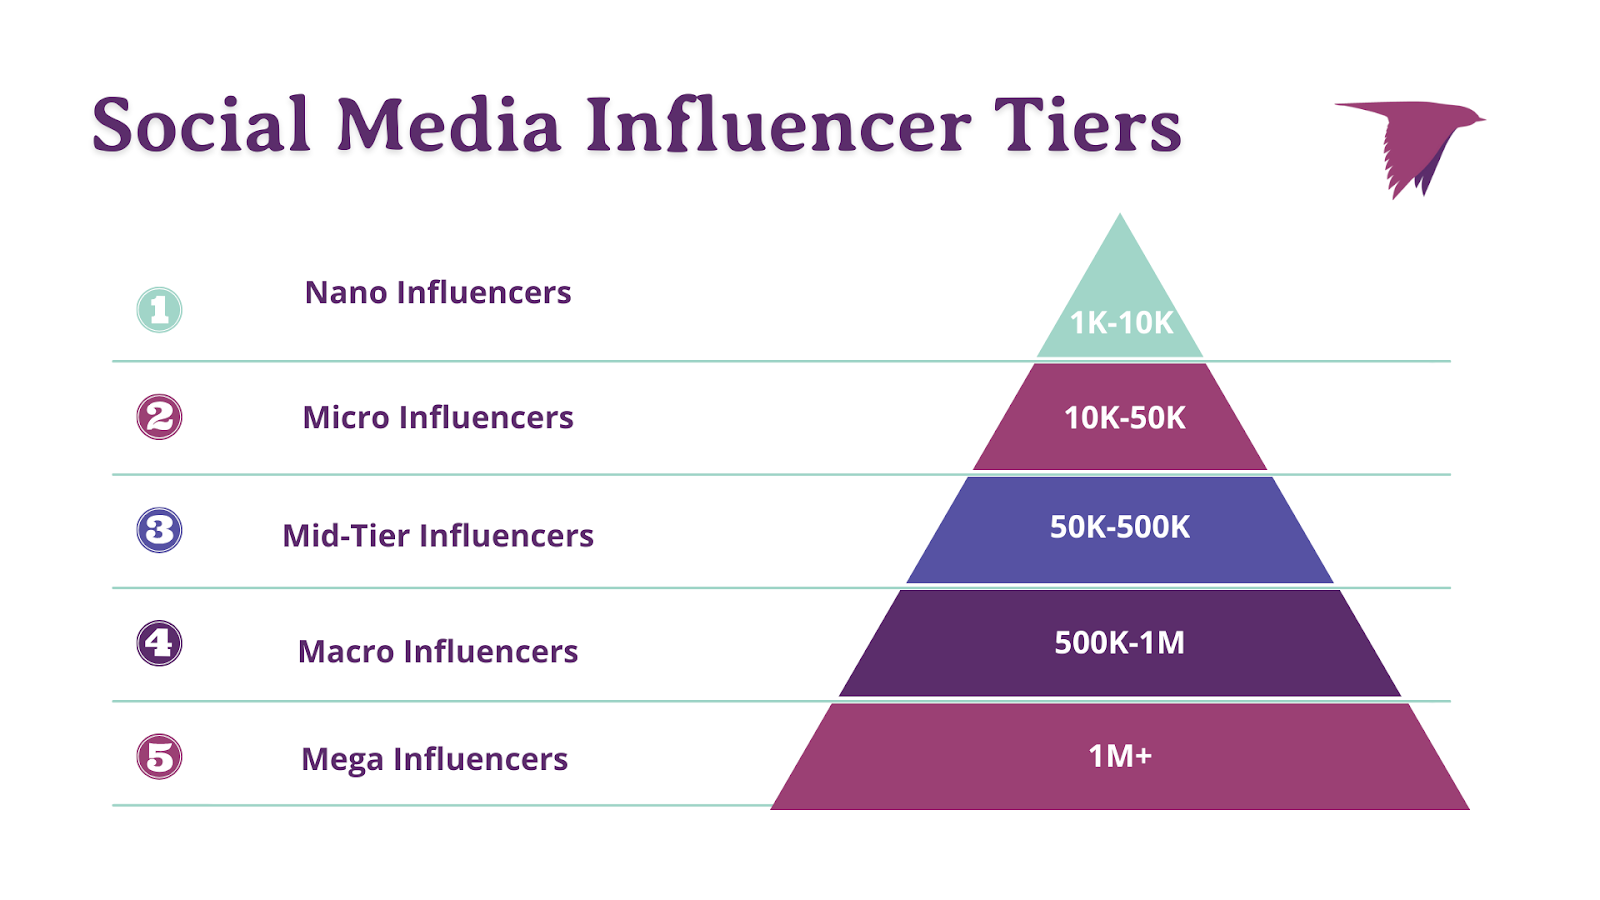
- Mega Influencers: They reach a huge audience with broad appeal.
- Macro Influencers: They have substantial reach and engage with a diverse audience.
- Mid-tier Influencers: These guys strike a balance between influence and authenticity, making more personal connections.
- Micro Influencers: They're all about specific niches, building genuine connections within their communities.
- Nano Influencers: They keep it real with a small but super engaged audience.
Find the Right Influencer for Your Brand
Start looking for influencers on social media by looking up keywords and browsing your competition’s pages. Throwing a question sticker on your Instagram Stories could be a great way to directly ask your audience whose content they enjoy.
Once you’ve found a potential content creator, browse their content. Ask yourself:
- Is this a good fit?
- Who is their target audience?
- What is their engagement rate?
- How do their values align with your brand?
- How often are they posting sponsored content?
- Would this person enjoy your product or service?
Once you’ve decided this is the person you want to work with, it’s time to reach out. Look for an email address. Content creators get a ton of DMs. If you can’t email them, make sure to comment on their post that you’ve sent them a DM — but make it an authentic message so you don’t sound like a bot!
It’s important to be mindful that being a content creator is often a full-time job, so be respectful with their time. Before you reach out, make sure you are familiar with the type of content they produce, who their audience is and what your specific ask is.
To set the right context, ask for their media kit and be clear about who you are and what you're looking for. Don't forget to mention your budget upfront. Smaller influencers may be open to gifting opportunities, but remember, this is their job and they deserve to be paid fairly for their time.
When it comes down to negotiating timelines, content creation specifics, and budget considerations - make sure it's a win-win situation for both parties involved.
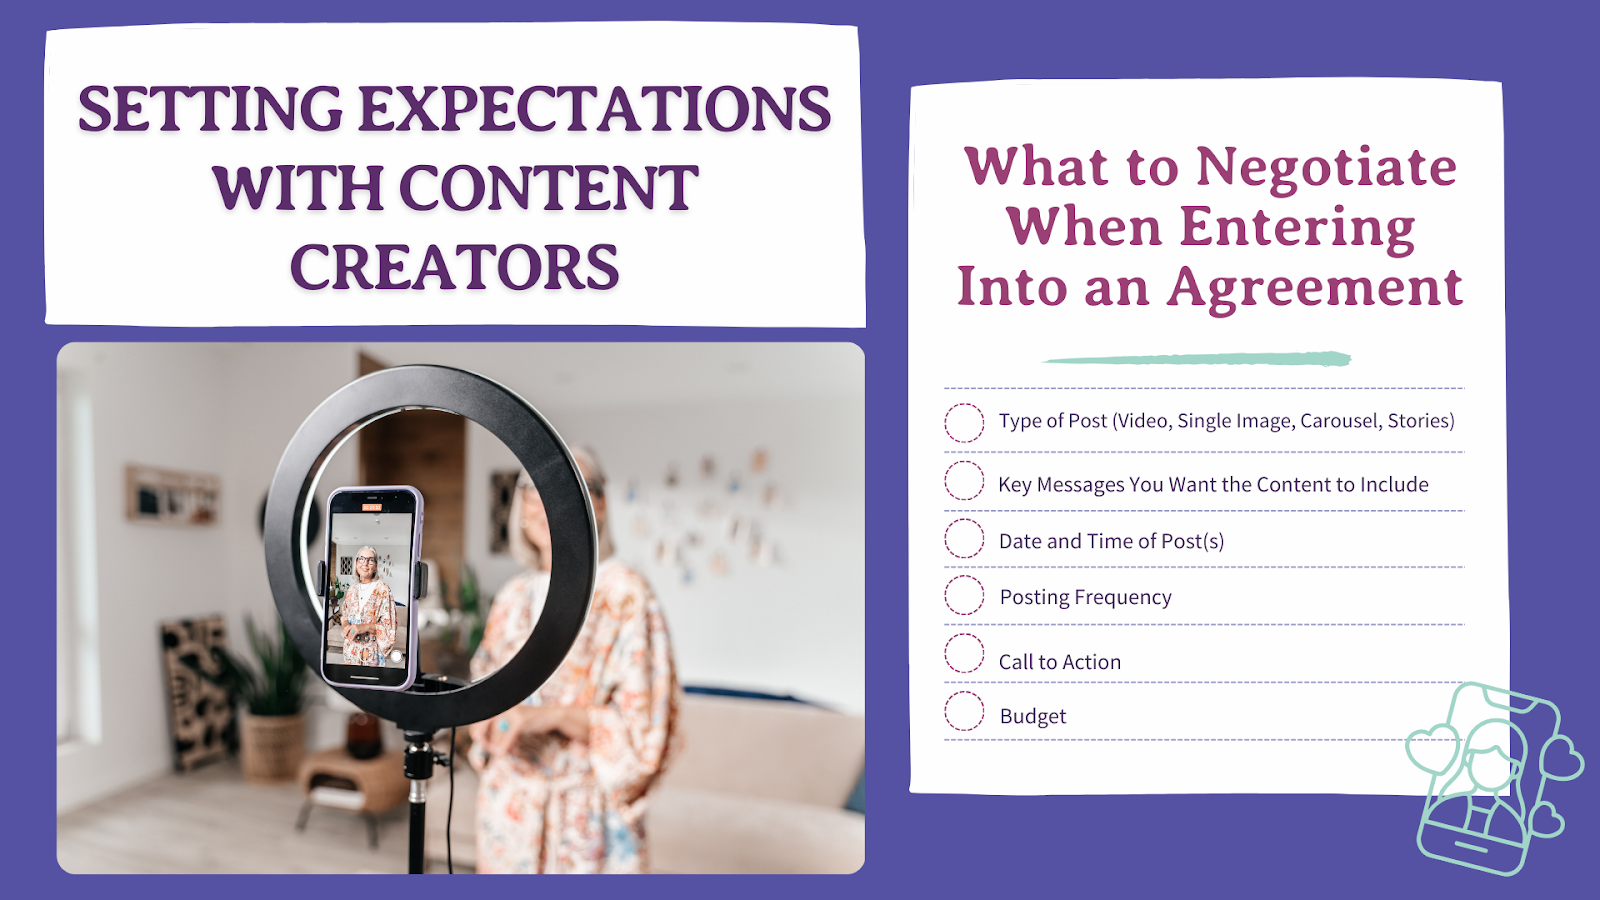
Set Goals and Expectations
What does success look like for your campaign? Are you aiming for increased brand awareness, higher engagement, more website traffic, or actual sales? Here are some key performance indicators you should consider before your campaign rolls out:
Brand Awareness
This includes reach, impressions and views — anything that indicates your audience size and visibility.
Engagement
Here you are looking for likes, comments, saves, shares and @ mentions. This is our favourite because you can get direct feedback on what’s resonating with your audience.
Click Through Rate
This measures how much traffic went to your website during the influencer marketing campaign.
Conversions
To increase your conversions, create special promo codes and affiliate links for your influencers before your campaign starts.
Expectations
There is a reason we love documents and processes. That way, everyone is on the same page. We’ve heard horror stories about working with influencers, so it’s important to set clear expectations on:
- Type of post (video content, Stories, single images, carousels)
- Key messages you want the content to include
- Date and time of the post(s)
- Posting frequency
- Call to action
- Budget
Influencer marketing is about understanding your target audience, building authentic connections, and creating meaningful content that resonates. By working with content creators who share your values, you can position yourself as a leader in the industry and drive impactful results for your brand.
If you’re interested in influencer marketing, the team at Starling Social can manage your campaign from start to finish. Contact us here to learn more.
How to Take a "Bricks and Feathers" Approach to Your Content
Raise your hand if you’ve ever found yourself in this situation:
You’ve spent several hours putting together a piece of long-form content, but now you’re left trying to figure out how to get as much mileage out of that giant piece of content as possible.
Enter the concept of “bricks and feathers”, a handy way to think about getting the most out of the effort you put into your content marketing strategy.
Not only does this approach save time (so important!) but it also adds a cohesive element to your content across all your digital channels, from your blog, to social media, newsletter and more.
Today I’m going to be digging into this useful concept and discussing how your business can use it to your advantage, so let’s dive right in:
Why the “Brick and Feather” Strategy Works for Content Marketing
The “brick and feather” strategy works because it solves a lot of the pain points that marketers face, including:
Scalability: You only have so many hours in the day, and by adopting this approach you can get more mileage from the content you share.
Cadence: Using “feathers” from your “bricks” allows you to speed up your content cadence and fill in gaps in your content queue.
Message discipline: Everything you publish should meet your customers at a stage in their buyer’s journey, and this approach bakes in message discipline so your audience feels trust and familiarity with your content.
What are “Bricks and Feathers”?
I was first introduced to this concept while researching content strategies for a talk I gave at the Engage Digital Media Summit way back in 2018.
I was looking for a succinct way to sum up something that I’d learned through my hands-on experience running Starling Social that I could introduce to my audience and help them understand without taking up too much time in my talk.
Here’s a summary of what I shared on stage that day:
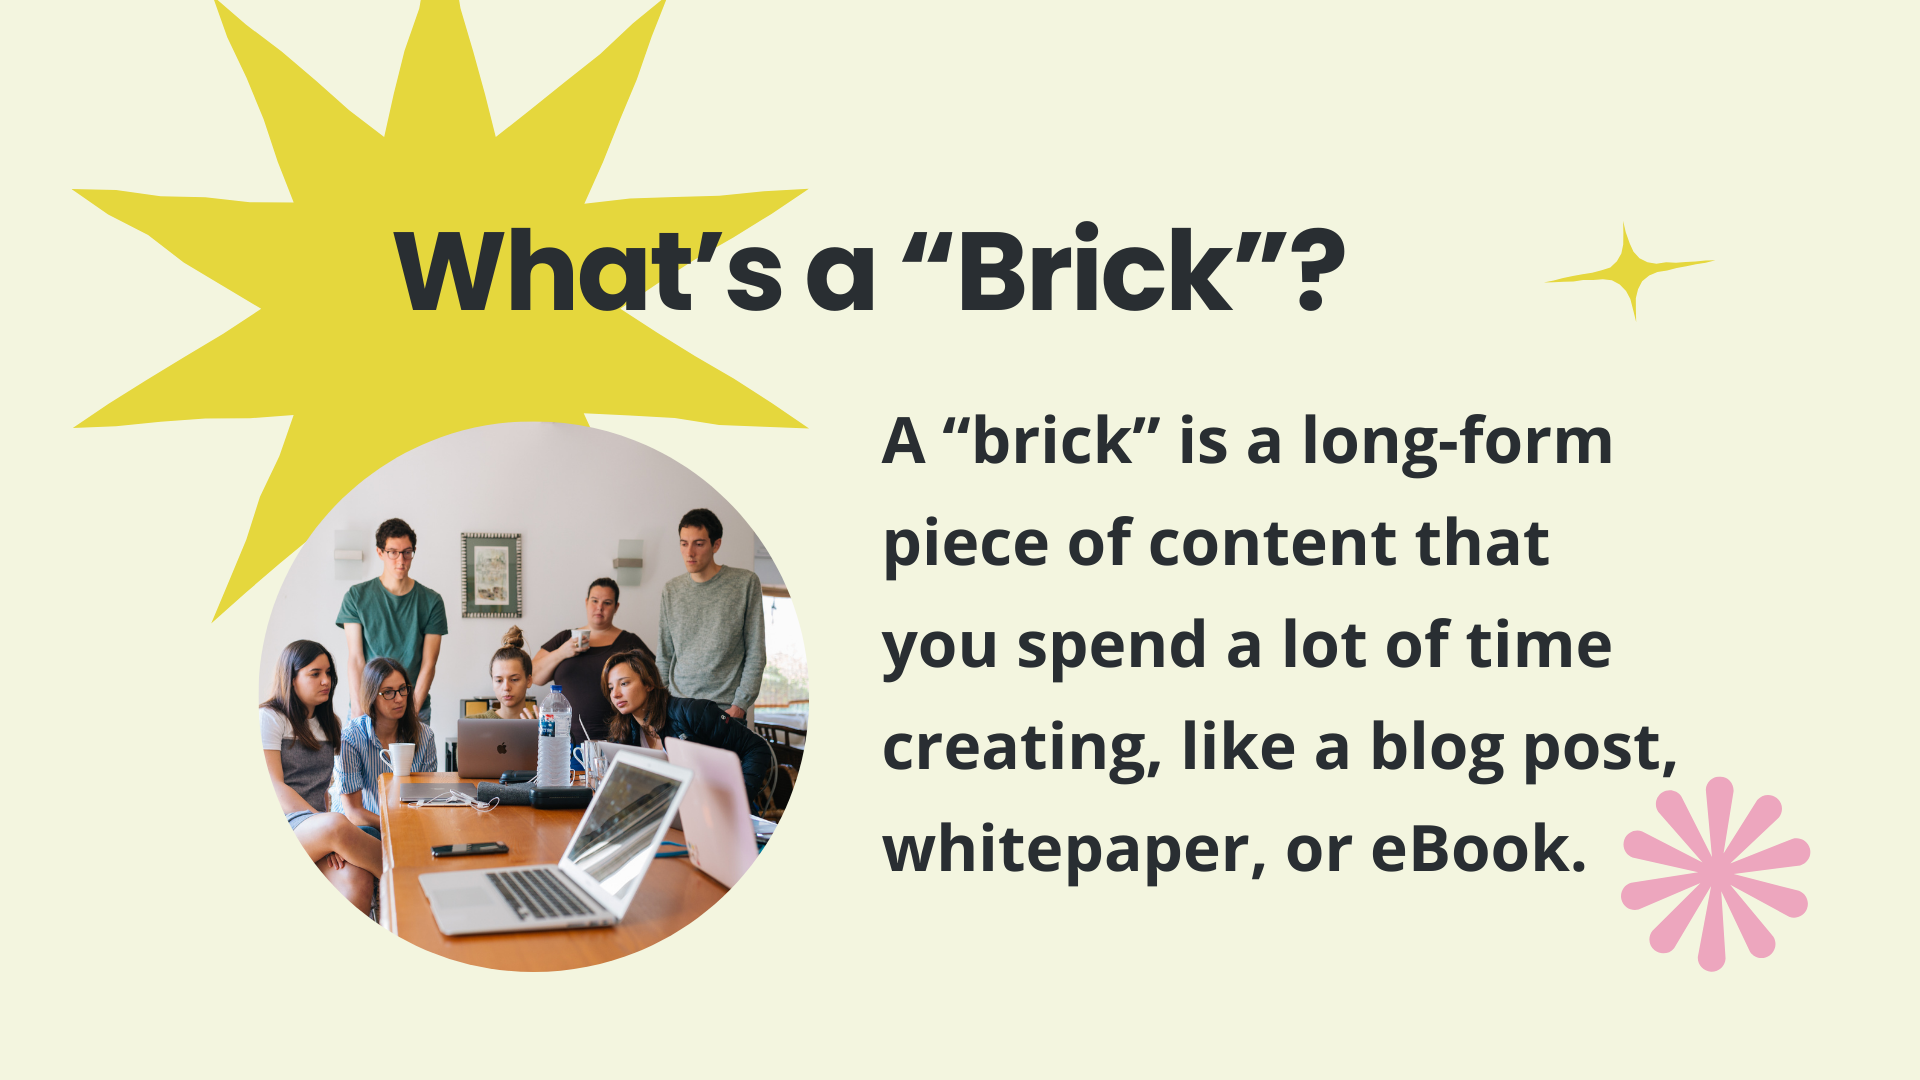
Bricks: A long-form piece of content that you spend a lot of time creating.
This could be a blog post, whitepaper, eBook, case study… you get the idea. If you spend more than a few hours on a signal piece of output, it counts as a brick.
Bricks are also pieces of content that take time to consume on your audience’s end, too. A good piece of long-form content helps move your prospects further down the sales funnel, can open up conversations, and positions you as a subject matter expert.
Bricks are also effective because they increase the search engine optimization (SEO) value of your website. Long-form content is more likely to be referenced and linked-to by other sources online, which helps drive traffic to your site.
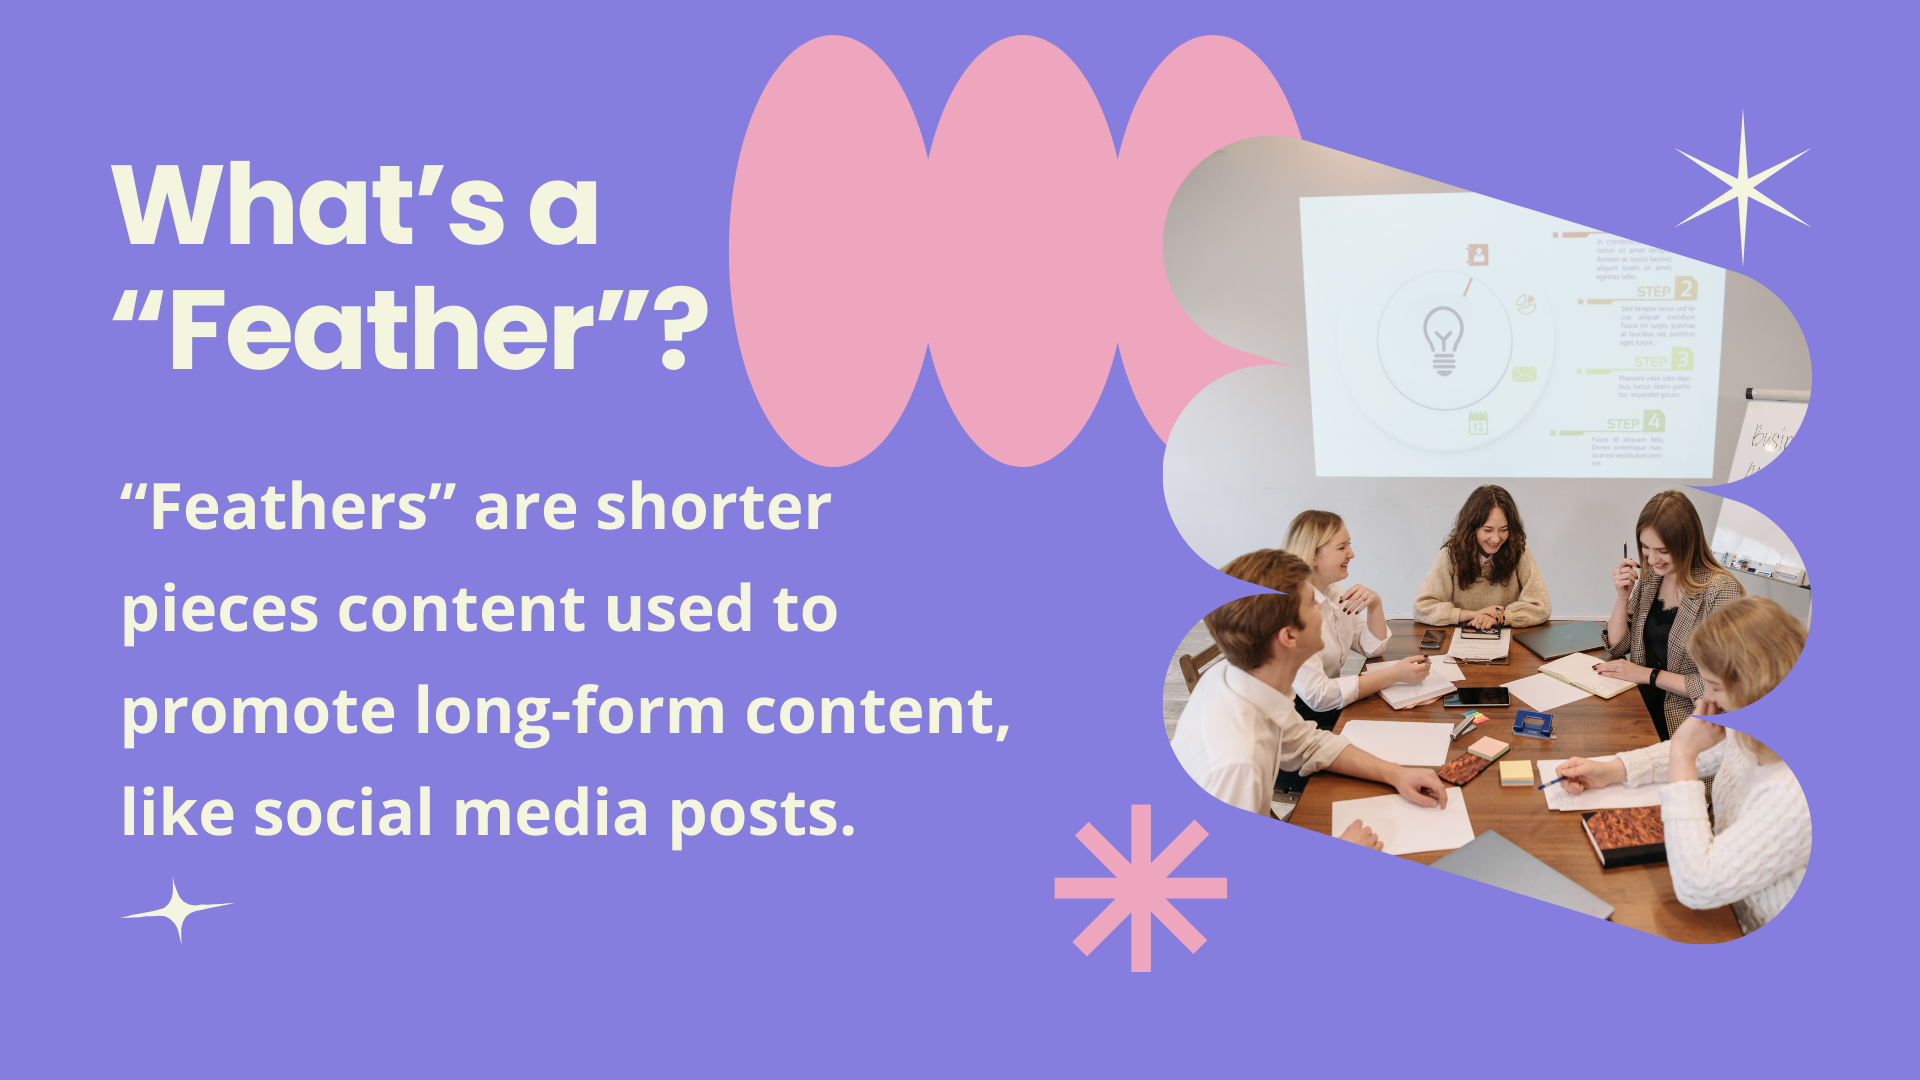
Feathers: Short-form content used to promote long-form content.
Once you have your “heavy” brick produced, it’s time to break it up into snackable chunks, aka your “feathers”.
Some examples of feathers include:
- Social media posts promoting the piece and sharing insights from the piece.
- Videos exploring key themes and acting as calls-to-action to read the whole thing.
- Statistics and visuals that sum up key parts of your content.
- Newsletters that share “snippets” of your content and link back to it on your site.
Each “brick” can be turned into multiple types of “feathers” and easily extended into weeks or even months of content!
Bricks and Feathers: The Best of Both Worlds
Using this approach to your content saves time, amplifies the ROI of your long-form content, and can keep potential customers coming back to your website over and over, eventually encouraging them to contact you.
If you want to chat more about how this strategy can work for your business, drop us a line!
Ethical Content and Content Marketing in the Age of AI
Written by Sr. Account Manager Alicia Kurz
Here at Starling Social, we’re all for working smarter, not harder. With new AI writing tools popping up what feels like weekly, it would be silly not to utilize them. They can help with spelling and grammar edits and are great for idea generation. What these tools still can’t do is write like humans.
We’re not going to BS you and try and say we never use AI, in fact, it’s almost impossible to get around. Even our scheduling tools have built-in AI features. As someone who uses these tools, the AI output is glaringly obvious, which is why we opt out of certain features. We spot content written by AI in blogs, captions, newsletters, and, honestly, everywhere. This just reinforces the difference that a human touch can make in your content — and we’re okay with that!
Let’s dig into the ethics, pros and cons, useful tools, and everything AI content marketing related.
The Intersection of Ethics, Content, and AI
AI is not going anywhere, and neither is the need for more content that’s on trend, on brand, and delivered in a timely manner across all your marketing channels. With that, comes ethical considerations.
What’s crossing the line when it comes to producing content for your own business — or in a marketing agency’s case, other businesses' content when AI is involved?
We believe in transparency, and using AI to enhance content, as opposed to compromising our ethical standards. What’s considered ethical in our field when incorporating AI into your writing, is using tools to streamline processes (like editing) or spark ideas. What isn’t cool, is plugging an idea into ChatGPT, asking for a 500-word blog, and calling it your own.
Using AI to assist in writing brings up concerns about authenticity, plagiarism, biases, and what responsibilities writers have. We don’t have all the answers, but here are a few things to consider if you are going to use AI to help create your content:
Authenticity: Please edit or prompt your program to use your (or your brand’s) voice, values and key messages. Otherwise, your writing will sound robotic and boring. Keep it true to your brand.
Accuracy: Just like when you’re scrolling through social media, fact-check your information. AI sources content from across the internet, so there’s no guarantee that it got its information from a reliable source.
Honesty: Don’t deceive your audience by passing off work created by AI as your own. Keep plagiarism and copyright law in mind, and always ask if it feels right to put your name on AI-generated work.
The only way to use AI effectively is with human oversight. While these tools offer efficiency and automation, a person is what makes your content align with brand values, quality standards, and ethical considerations.
The Pros and Cons of Leveraging AI in Content Creation and Marketing
We’re in a love-hate relationship with the idea of AI and content creation. Editing tools are a lifesaver for writers and people with screen fatigue (read: us). But we’re now seeing a lot of content that’s lacking a human touch, making it boring and forgettable.
Pros
Content generation: You can truly ask AI to write you anything, and it will produce it in a matter of seconds. This is great for generating ideas, asking questions, and helping to repurpose content.
Cost: It’s free, and you really can’t beat that. Of course, you can get access to better AI services with paid subscriptions, but there are free options readily available for anyone with internet access.
Insights: If you have data from Google, your social channels, or a newsletter, you can use AI to help you identify trends and keywords and develop strategies to improve the return on your marketing efforts.
Editing: After staring at your own work for hours on end, it feels impossible to spot minor spelling and grammar errors. These extensions improve your writing and help avoid any careless mistakes and embarrassing errors.
Availability: AI writing tools are available round-the-clock, allowing marketers to generate content at any time, regardless of time zones or office hours.
Cons
Lack of Creativity: Since AI sources information from what’s already available on the internet, you could argue that it’s unable to be creative at all. Additionally, (for us anyway) it feels good to come up with creative ideas and execute them.
Quality Concerns: You can usually tell when AI wrote something. There’s awkward phrasing, a lack of personality, and consistency to a fault in AI’s tone and style.
Limited Understanding: AI doesn’t quite get nuances, cultural references, trends, or context. The output can sometimes be wrong, or inappropriate.
Potential Plagiarism: Oops, AI can spit out plagiarized material, risking your reputation or even legal repercussions. This is another reason to only use these tools for information gathering, inspiration, and editing!
No Human Touch: AI can’t produce content that resonates with the human experience because it hasn’t had human experience. Think about those videos where people get AI to watch 1000 hours of Hallmark movies and create their own — they just don’t make sense. The key to connecting with your audience is authenticity!
Your Brain Stops Working: Not really, but kind of. You know what they say: if you don’t use it, you lose it. The more you write, the better you get, so using AI to write everything for you just takes away any opportunity for you to improve that skill on your own.
How to Spot AI in Writing
Spotting AI-generated writing can sometimes be challenging. After all, writing isn’t everybody’s strong suit. Keep an eye out for repetitive patterns, unnatural language transitions, or inconsistencies in writing style.
There are common “red flags” like:
- Unusual phrasing
- Generic language
- Emotionless writing
- Heavy use of keywords
- The same tone and style
- Lack of personal anecdotes
The bonus of having content so heavily produced by AI is that human-authored content now stands out even more. No algorithm can replicate the depth of human emotions or intuition.

5 Useful AI Tools
Grammarly
What it does: Analyzes written text for grammatical errors, spelling mistakes, punctuation issues, and sometimes even style and tone inconsistencies.
Note: Make sure you set your location correctly (it defaults to U.S. spelling) and make sure Grammarly’s corrections still sound like you. Their “rewrite for clarity” option can be grammatically correct, but sometimes removes the personality from your piece.
Hemmingway Editor
What it does: Uses AI to fix common grammatical issues and spelling mistakes. It also assesses the reading level of your writing.
Note: In writing for the public, you want your score to be at at 8th grade reading level.
ChatGPT
What it does: It is a chatbot that can provide information, answer questions, generate content, and assist with various tasks.
Note: Content generated from ChatGPT sounds automated. We recommend using it to gather information, ask questions, or even help with repurposing content.
Rytr
What it does: It’s an AI writing software that can create blog posts, email and ad copy, outlines, stories, and more. It also has functions like checking for plagiarism and keyword research.
Note: We find it useful for creating blog outlines, but you still need to edit the output heavily.
Perplexity
What it does: This chatbot is similar to ChatGPT, but it provides sources for its output.
Note: This one is great for doing research!
There are so many AI content creation tools that we aren’t going to go through them all, but these ones are vetted. We aren’t trying to sell you anything—just give you a heads-up on what’s available.
Balancing Automation with Authenticity
There are clear benefits of automation in marketing, like efficiency and scale, but authenticity is necessary to build trust and credibility with consumers. Only people have the sense to create great, personalized experiences that capture consumers' attention.
Authenticity isn’t something that can be automated. It requires empathy and an attempt to understand and respond to a real person. Too much automation risks creating impersonal content that fails to resonate with your audience.
If you’re interested in human-authored copywriting to connect with your audience, contact Alyson at alyson@starling.social to discuss your next project.
Everything You Need to Know About The Current State of Threads
By Alyson Shane, President
Unless you’ve been living under a rock (and with the current state of social media, we don’t blame you), you’ve probably heard about Meta’s alternative social platform to Twitter/X: Threads.
As Twitter/X continues to hemorrhage users and lose public trust and confidence, Threads is moving in to replace the once-mighty microblogging platform and create a safer, more inclusive, and ultimately more positive space for people and brands alike.
Starling Social has been on Threads since the beginning (we actually left Twitter/X late last year) and several of our clients have been exploring opportunities on the platform, too, which is why I wanted to share an up-to-date deep dive on Threads so you can decide if a switch to the platform is right for you.
Let’s dive right in:
What is Threads?
Like I said above, Threads is Meta’s alternative to Twitter/X. It launched in July of 2023 and started out strong, amassing over 100 million subscribers within the first week.
Threads, like Twitter/X, is a “microblogging” platform, meaning that the content on the platform focuses on short, text-based updates vs. platforms like Instagram or TikTok which focus on images and video, primarily.
The platform was pretty bare-bones at the outset, but within a few weeks Meta had been rolling out updates since pretty much Day One.
With that in mind, let’s take a look at the most important features on the platform:
What Are the Most Important Threads Features?’
Meta’s been rolling out updates constantly since last July, meaning that there’s a lot to cover. With that in mind, I’ll be breaking it down into some high-level features, and digging into some in a more meaningful way because I think they matter most.
Trending Topics
Similar to other platforms, users on Threads can now explore “trending topics” that the algorithm (more on that below) thinks they might be interested in based on what they’ve posted.
“Trending topics” shows the number of active discussions on each topic, allowing users to stay up-to-date on trending discussions and join relevant conversations.
In January, app researcher Alessandro Paluzzi shared a screenshot showing that “Today’s Topics” appeared to be available.
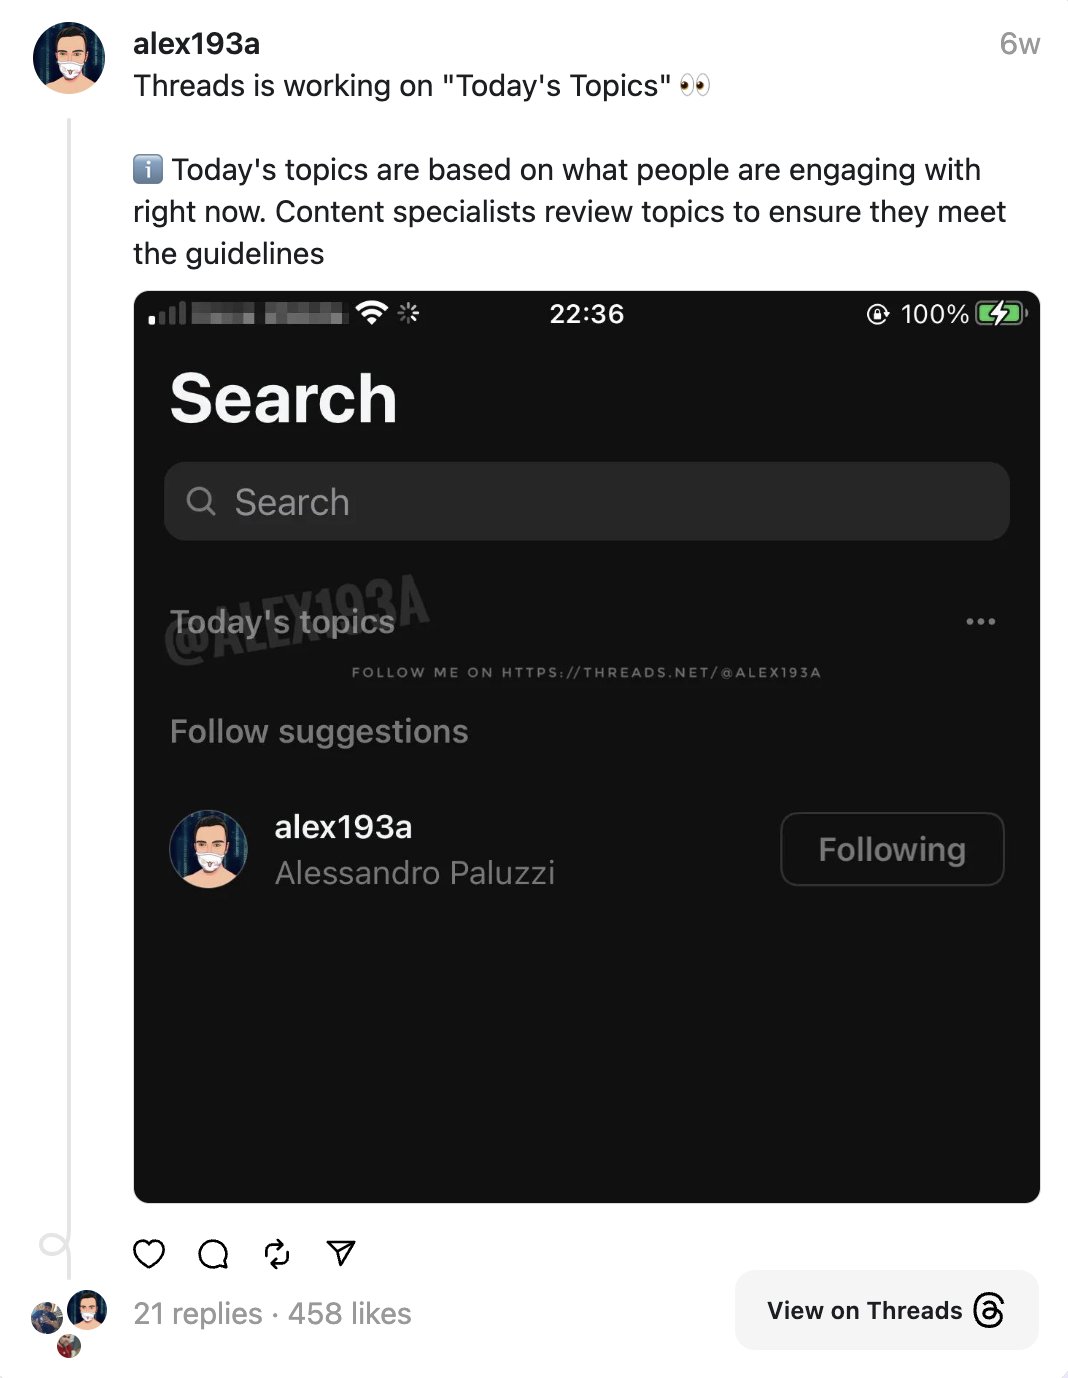
In mid-February Threads confirmed that they were currently testing the option with U.S. users, with the intention of rolling it out worldwide. This signals a strong intention to replace Twitter/X as the go-to- platforms for timely news and updates worldwide.
Voice Threads
Last fall Threads rolled out the “Voice Threads” feature, allowing users to create new voice threads, or reply to other people’s posts with a voice message. Once a user taps the microphone icon a voice recording and captions are automatically generated (and edited!)
This seems to be a nod to apps like the 2021 platform Clubhouse, but I’m not sure how popular this feature is turning out to be?
Anecdotally I’ve seen almost zero content published with just an audio recording, but that doesn’t mean that there won’t be opportunities to make use of this feature in the future.
Account Switching
If you work in digital marketing then you can appreciate what a huge deal this is. The update allows users to switch between multiple accounts without logging out and back in by clicking the icon in the top-right corner.
You can also add more profiles (perfect for social media managers), but the exact number of accounts seems to be a bit murky, so my recommendation is to start small and prioritize the most important accounts you need to manage, first.
Sorting Account Engagement
I love this feature! Under your “Activity” tab, you can sort how other users have engaged with your content to get a sense of what’s most popular and how your account is growing. You can drill down into several categories, including:
- All
- Follows
- Replies
- Mentions
- Quotes
- Reposts
- Verified (hows when a “verified” account has engaged with you)
Send Posts as Instagram Direct Messages
Direct Messaging (DMs) has been available on Threads since late last year, but if you want to share a Threads post to your Instagram profile, now you can do that, too!
This is a smart play in my view, since a lot of memes and “hot takes” that get shared across social platforms tended to come from Twitter/X previously (and still do, in some cases) — this ability means you can find something funny, entertaining, or interesting on Threads and share it easily without the need to grab a screenshot and manually upload it to another platform.
This also reinforces ties between Threads and Instagram, too, which should help more users start moving to the platform.
Keep Track of Your Likes
This is a common feature in other apps, too (Instagram also allows you to do this, but it’s more “hidden” in your profile).
In your profile, just click “Your Likes” to see all the Threads posts you’ve liked recently.
This is useful because one of the common complaints about social media platforms that aren’t chronological (or that move quickly, in the case of a platform like Threads or Twitter/X) means that you can quickly lose a post that you’ve liked and want to share.
This option makes it easy to find, reference, and re-share content.
Adding Alt Text for Images
In a push to increase accessibility on the platform, Threads has introduced the ability to add custom alt-text to images and videos.
(Alternative (Alt) alt text describes “why” of an image or video, and in the case of websites, what’s on a page. Alt text is read aloud to users by screen reader software, and it is indexed by search engines. It also displays on the page if the image fails to load.)
Adding ALT text not only increases accessibility on the platform, but helps your content get “indexed” and sorted by the Threads algorithm, which helps users who are looking for content like yours find your posts.
Threads Uses Hashtags, aka Content Topics
Threads has a hashtag-like function that allows you to add a hash “#” before a topis to help you join discussions around that theme.
Hashtags have been around for a while, and were actually popularized by Twitter/X back in the day, but I love how Threads formats them. Take a look:
What I love about this approach is that even if you embed the topic into your text like the example above, it doesn’t decrease readability the way a hashtag does.
Threads Uses Instagram’s Community Guidelines
Threads is a tie-in to Instagram. According to Threads’ Terms of Use (TOS), content on the platform must follow by Instagram’ Community Guidelines, describing it this way:
“We want Instagram to continue to be an authentic and safe place for inspiration and expression. Help us foster this community. Post only your own photos and videos, and always follow the law. Respect everyone on Instagram; don't spam people or post nudity.”
Other topics to avoid on the platform include:
- Content that depicts self-harm, eating disorders, violence or suicide
- Sexually explicit or suggestive content
- Promotes the use of certain regulated goods, like tobacco
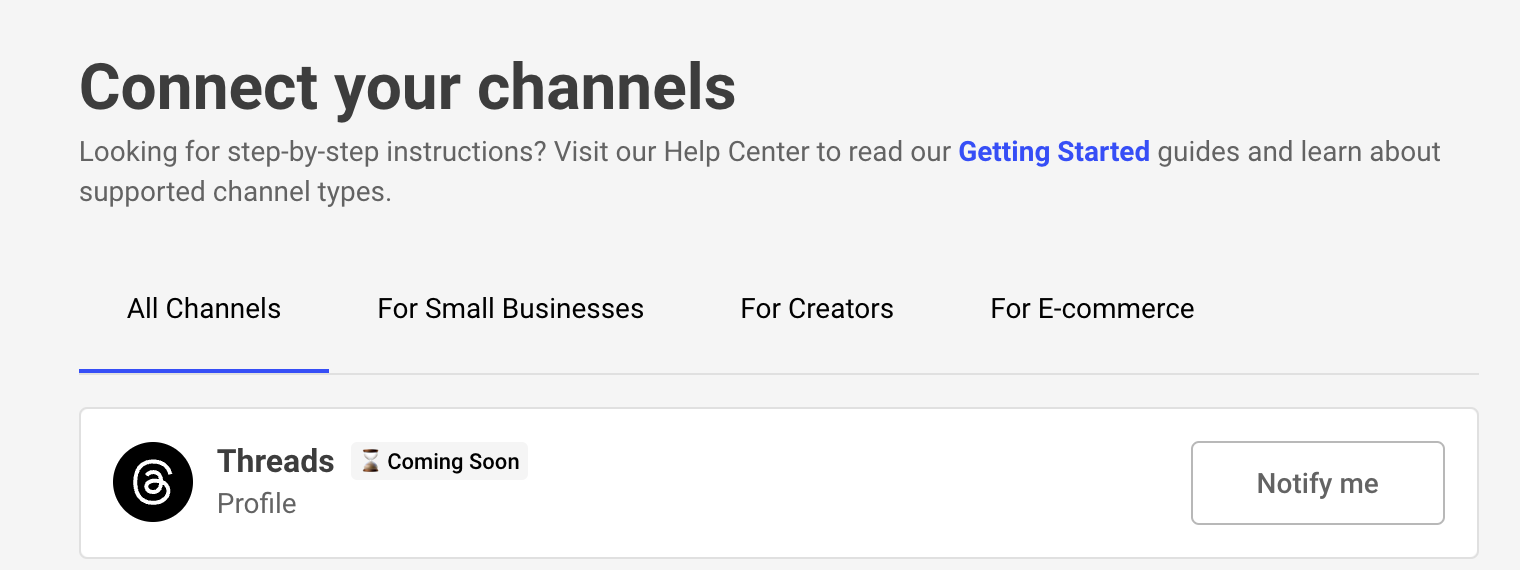
API Support is Coming (Hopefully Soon!)
API = Application Program Interface, and refers to how different apps “talk” to one another.
When a platform has API integration, it means that you can post to it from 3rd party sites like Buffer, Later, Sprout Social, etc. — this is a boon for social media managers and people who like to “batch” their content creation and will be a huge asset to the platform when it rolls out.
Threads has confirmed it’s coming and we can even see evidence of that in 3rd party apps, too:
Post Drafts are Coming (Hopefully Soon!)
At the time of this writing, users can’t currently save drafts within Threads, but the platform has confirmed that that’s coming soon, too.
As anyone who writes content on the web knows, sometimes you have an idea for a post that you don’t want to publish right away — maybe it’s outside of peak hours, or maybe you want to jot down an idea or come back to it, for example.
Once this feature rolls out you’ll be able to draft posts to your heart’s content.
The fact that Meta listened to its users’ needs right from the get-go is a really positive sign in my view, because it shows a dedication to building a platform with features that will keep attracting and retaining users.
These are just a handful of the most important existing and upcoming features, with more to come I’m sure.
How Does the Threads Algorithm Work?
People love to talk about “the algorithm” no matter what platform they’re on, so let’s spend a little time digging into how the Threads algorithm works:
The Threads Feed is Ranked By AI
In an interesting rhetorical move, Threads doesn’t refer to its algorithm as an “algorithm”, but instead describes it as an “artificial intelligence (AI) system”.
This isn’t actually unusual at all; all algorithms are based on a reactive machine learning AI to decide what users see on their feeds, but Threads appears to be the first platform openly embracing this language.
The AI Prioritizes Value
Since they’re all owned by Meta, Threads uses the same ranking system as Instagram and Facebook.
Similar to other platforms under the Meta umbrella, Threads’ primary focus when deciding what to show other users is based on how “valuable” the content appears to be. As per Meta:
“Posts that the system predicts will provide more value for you are shown higher in your feed. The system also tries to ensure your feed has a balanced mix of content types.”
The best way to look at this is to ask yourself: what do you want your followers and other users to get out of watching or reading your posts?
Some things to consider include:
- Showing them how to do something or sharing your unique perspective on a topic
- Showing them how to solve a problem
- Starting (or participating in) conversations where you’re a subject matter expert and can inform and support your followers
- Making them laugh or smile (gifs and photos are excellent for this!)
Threads’ AI System Only Impacts Your “For You” Feed
Right now, Threads’ “For You” experience is similar to what you’d get from TikTok’s FYP (For You Page). You can find it by tapping the Threads logo or the Home button, then the For You or Following tabs.
The Following feed appears to be a chronological one, which is another way that the platform shows that it’s listening to what users want and not trying to shoehorn a bunch of older, less relevant content from the people you follow into this feed.
This might change, of course, but right now you can toggle between the two feeds and get the best of both worlds.
What Shapes a Users’ Feed?
Like most other platforms, Threads uses a combination of “signals” that decide what content appears in a users’ feed, and in what order. This includes:
Whether or not a user will like a post, including:
- How many posts someone has seen on their feeds
- How many posts they’ve “liked”
- How many posts of an author’s they’ve seen and liked
How likely a user is to view the replies on a post, including:
- How many times they’ve clicked on an author’s posts in their feed
- How many times others have clicked to reply to a post
- How many replies they’ve seen
- How long since they were last active on the platform
How likely a user is to scroll past a post without engaging with it, including:
- How many times they’ve seen a post How many times they’ve liked an author’s posts
- How many times other users have viewed the same post
The “Fediverse” and What That Means for Threads
The term “fediverse” is a portmanteau of “federation” and “universe” and refers to a collection of social networks that can communicate with each other.
Threads has been promising to opt-in to the fediverse by allowing Threads to be accessible by, and exchange information with, other social platforms. (This is also referred to as “interoperability” in technical terms.)
This is important because it means that other platforms like Mastodon and BlueSky can follow you on Threads, even if they aren’t on Threads themselves. Aka, your reach on Threads could potential exceed the 130 million or so existing users and tap into other people’s content on other connected platforms, too.
As an aside, the concept of the fediverse is an exciting new development that has the potential to shake up the “silos” of social media as we know it, so this is an important development to keep an eye on!
Get Started on Threads!
Threads is an exciting new space and is definitely looking ahead at the future of social media and how we connect online.
If you’re tired of the dumpster fire that is Twitter/X, then Threads offers an exciting new alternative that is definitely worth checking out. Here’s how to get started.
If you’re already on Threads, we’d love to know what your experience is like! Tag @starlingsocial in a post on Threads.
10 Unique Ways to Celebrate IWD 2024
Save the date for March 8.
International Women's Day is a global call to action, recognizing and amplifying the contributions of women across the social, economic, cultural, and political landscape. Last year, we wrote a list of ways your business can celebrate IWD, but as time goes on, best practices evolve (yay, progress!), so we thought we would create a list of more ways to #InspireInclusion.
What Is International Women’s Day?
IWD stretches back to 1911, evolving over the years. Now, diversity, equity and inclusion are non-negotiable. With the help of social media, feminism has a global voice, organizations face scrutiny for their bad actions, and we are able to challenge stereotypes and biases. (See: Kyte Baby scandal)
Recognized by the United Nations in 1977, IWD has since become a global phenomenon, with each year focusing on themes related to women's rights, equality, and empowerment. This year’s theme is Inspire Inclusion. When women are included, there's a sense of belonging, relevance and empowerment.
Why Is International Women’s Day Important?
If you’re reading this blog and thinking, “it seems pretty fair to me,” then let’s look at some stats:
Women represent roughly 1 in 4 C-suite leaders, and women of colour just 1 in 16. - Women in the Workplace report 2023
Canada has registered a 0.2 percentage-point decline in the overall parity score since the last edition, the United States has seen a reduction of 2.1 percentage points. At the current rate of progress, 95 years will be needed to close the gender gap for the region. - Global Gender Gap Report
There are stats on the “glass ceiling,” micro-aggressions in the workplace, ambition levels, remote and flexible work — you name it. The data clearly shows that women (particularly women of colour) are underrepresented, under-compensated, and passed over in the workplace.
This day serves as a powerful reminder of women's ongoing challenges in various spheres of life. It sparks discussions on women's rights, creates awareness about gender inequality, and mobilizes efforts to accelerate gender parity.
Peek into reports like the Women in the Workplace Report and the Global Gender Gap Report for a snapshot of progress and a reminder of the urgency for continued action.
By amplifying women's voices, sharing diverse stories, and promoting inclusivity, IWD contributes to the larger movement for building a more equitable and just society for everyone. With that said, here are ways to celebrate IWD in 2024.
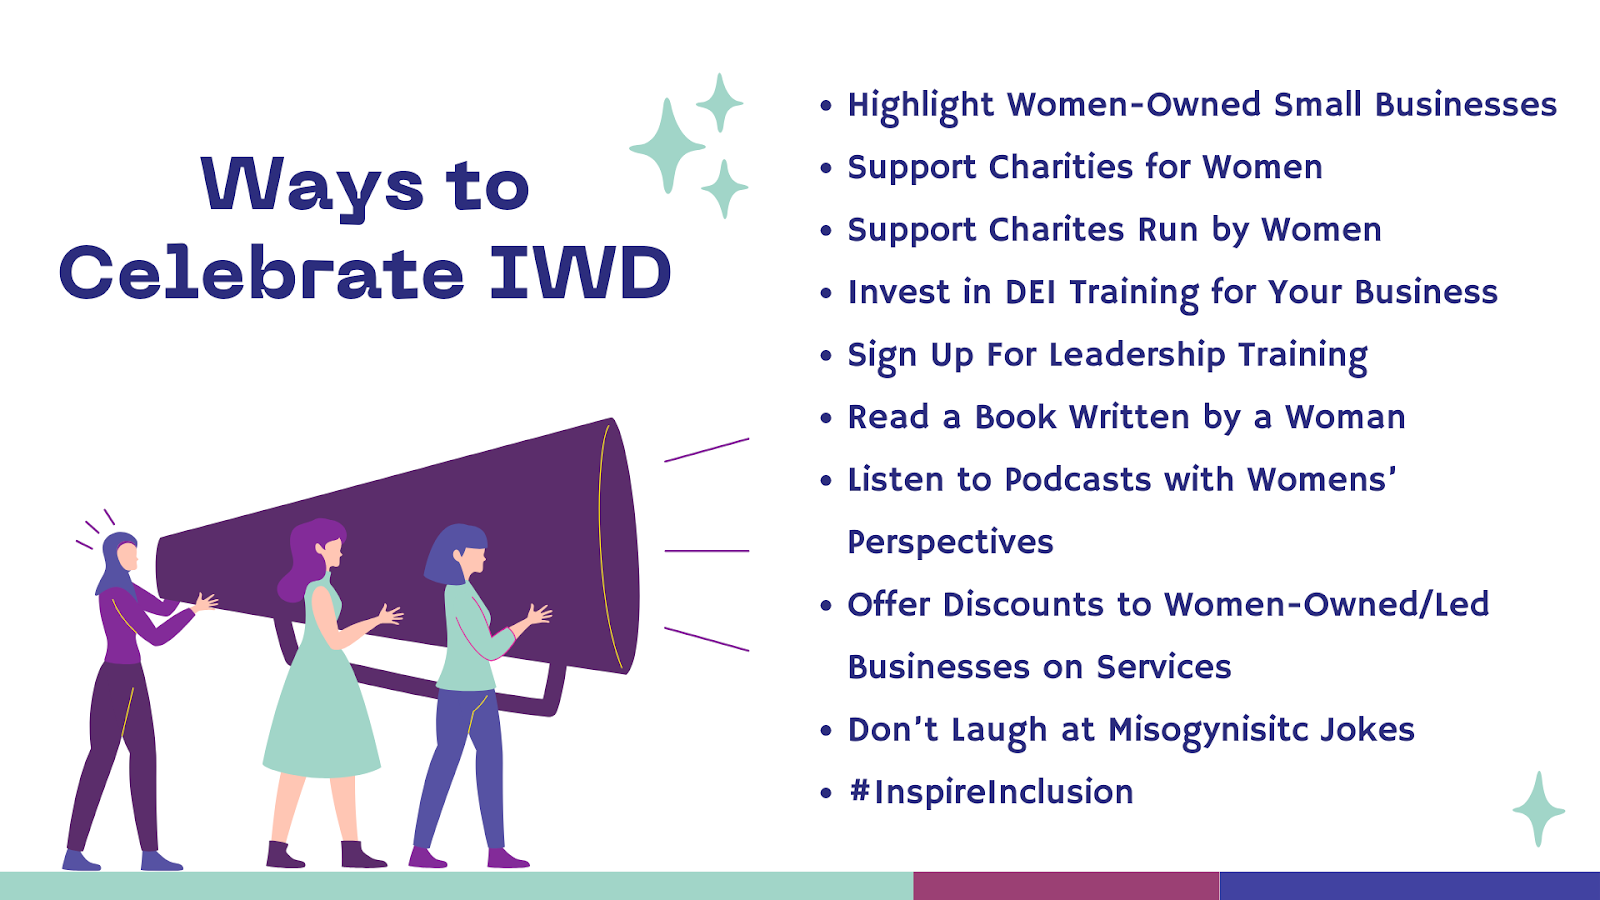
Highlight Women-Owned (Especially BIPOC Women) Small Businesses
This is something we try to do all the time, but we also suffer from burnout and high expenses… and Amazon is just there when it’s -40 outside.
However, we are lucky to have several resources* that help us find women-owned and BIPOC-owned businesses.
*Black-Owned Manitoba and BIPOC-Owned Downtown Winnipeg lists don’t list whether it’s a women-owned business, so you may need to do some of your own research. Here are a few BIPOC+women-owned businesses we personally recommend:
If you aren’t financially able to support women-owned businesses in this season of your life, we understand. Here are some free ways to support them:
- Attend events they host
- Leave a Google Review
- Like/Comment + Share a post on your social media
- Collaborate with them on your blog/podcast/website
- Tell your friends and family how great the business is
- Volunteer your skills (graphic design, copywriting, etc.)
- Listen to what they have to say and read their content (like this blog!)
Support Charities for Women
When we think of International Women’s Day, our first response is a celebration. However, it should also be a reminder that we need to accelerate gender parity. Charities focused on women's issues often work tirelessly to amplify the voices of those who might otherwise go unheard. By supporting these organizations, you contribute to creating a platform where women's stories, challenges, and triumphs can be shared, acknowledged and tackled.
There are a ton of charities to back, from local to global, and education to fighting gender-based violence. Bolstering these charities makes a lasting difference.
Support Charities Run by Women
When you support charities run by women, you actively contribute to breaking down gender stereotypes, promoting representation in leadership roles, and inspiring future generations.
These initiatives often emphasize intersectionality, recognizing and addressing the interconnected nature of various forms of discrimination, ensuring a more inclusive and comprehensive approach. Backing women-led charities is a tangible investment in creating a world where women have equal opportunities, rights, and access to resources, making a collective and lasting impact on the advancement of women's rights and overall societal well-being.
How You Can Support
Donate:
Every dollar counts. Whether it's a one-time or recurring contribution. Choose a charity aligned with your values and causes you're passionate about.
Volunteer:
Offer your time and skills to women-focused charities. Your expertise could make a significant difference in their initiatives.
Spread Awareness:
Share their stories and achievements on your social platforms.
Invest in DEI Training for Your Business
Diversity Equity and Inclusion training aligns with the core values of IWD and serves as a proactive step toward creating workplaces that are fair, inclusive, and supportive of women. These programs provide opportunities to address unconscious biases, challenge stereotypes, and foster a culture where diverse voices are heard and valued.
Sign Up For Leadership Training
Leadership training empowers women to overcome barriers, break through gender stereotypes, and navigate challenges in professional settings. It also aligns with the spirit of IWD by creating a supportive network and promoting the idea that women deserve equal opportunities to lead and excel in diverse fields.
Read a Book Written by a Woman
Here’s the thing: it really can be this easy. Everyone has a different capacity on how they are able to contribute to things like International Women’s Day. Some people have the time, resources and energy to organize an event, others can make a donation, and some people truly don’t have the time, energy or resources to do those things.
If you want to commit to buying books only written by women about women this year from a woman-owned bookstore — that’s fabulous.
But, if you are limited to library books and are looking for a great story and only have the energy to read one book per year, then pick a book written by a woman. Do what you can.
Listen to Podcasts with Womens’ Perspectives
When you tune in to women-led podcasts, you amplify diverse perspectives, celebrate women's achievements, and empower female content creators. It serves as a conscious choice to challenge stereotypes, promote gender equality, and build a sense of community around the shared experience of appreciating and learning from women's narratives. It's a deliberate act of support, recognition, and celebration of women's valuable contributions and stories across various fields and experiences.
Offer Discounts to Women-Owned/Led Businesses on Services
Addressing financial challenges and creating cost-saving opportunities builds lasting partnerships and increases women-owned enterprises' visibility. It contributes to corporate social responsibility, inspires confidence among women entrepreneurs, and aligns with the broader mission of IWD to create a more inclusive and equal world.
Plus, it feels good to do something nice for another woman-led company.
Don’t Laugh at Misogynistic Jokes
Sorry, Matt Rife, it’s just not funny.
By dismissing or trivializing misogynistic humour, we inadvertently endorse attitudes that demean and devalue women. When you choose not to laugh at misogynistic jokes, it’s a small but impactful step in fostering a more inclusive and respectful society.
Our go-to responses for inappropriate jokes:
- Ask them to repeat it
- Ask them to explain it
- Say, “I’m surprised you felt comfortable to say that out loud.”
- Express that it made you uncomfortable
- Just don’t laugh
#InspireInclusion
This year’s theme of International Women’s Day is Inspire Inclusion.
- When women aren't present, ask: "If not, why not?"
- When women are discriminated against, call out poor practice.
- When the treatment of women is not equitable, take action.
- Do this each time, every time.
All IWD activity is valid, that's what makes it so inclusive. Do what you can, when you can. Every action counts. Learn more on the International Women’s Day website.
Celebrating 10 Years of Starling Social
Written by Alyson Shane, President.
In July of this year I’ll have been working for myself for 10 years.
Saying this out loud, or even writing it, feels surreal. Not just because of how quickly the time has passed, but also because I’m in this position at all.
Which is why today I want to share the backstory behind how I got into my industry, the inspiration behind Starling Social, and a little bit of what drives me to be the kind of business owner and leader that I am today.
My Story
I never expected to run a business. In fact, I never expected to achieve much beyond scraping by at a 9-5 for most of my life.
I had a complicated home life as a kid - I was emotionally and verbally abused, and even moved out to live with friends for a while in Grade 12. I struggled with anxiety that was so intense that I couldn’t focus in school, and as a result my grades were so bad that I didn’t graduate high school on time.
I went to summer school to complete my diploma and worked a string of low-paying retail and fast food jobs for a few years after graduating. I was miserable and directionless.
I moved to Ontario and lived in Hamilton and Toronto for a while, but wound up coming back to Winnipeg as depressed as when I’d left, even though I’d managed to score a job working for the Provincial Government when I came home.
A “safe” union job should have felt like a blessing, but it compounded the negative feelings I had about my life. I felt trapped in a role I didn’t like, in an industry that didn’t excite me, and I started having panic attacks every day and sliding further into depression.
Then, one day, I was sitting on the bus* and the song “Gifts” by Propagandhi came on and a lyric I'd heard hundreds of times before started playing:
“All the slightly insane on the 18 North Main…”
For some reason, this time, the lyric hit me like a ton of bricks.
I thought: this is me. I'm slightly insane on the 18 North Main.
I realized that I needed to pull myself out of my rut and figure out what I wanted to do with my life... but my high school grades weren’t good enough to get into university, so I signed up for night classes at the Adult Education Centre.
I spent the next six months working full time and going to night classes from 6 - 9 PM, Monday - Thursday. It was brutal and I was exhausted all the time, but the support and encouragement I got from my teachers and the Principal at the school (who fast-tracked me so I didn’t have to do the full 12 month curriculum) was incredible.
I’d never had “adults” in my life encourage me or say I was smart or capable enough to achieve my goals. It was life-changing.
I finished night school, enrolled at the University of Winnipeg, and began working towards my degree in Rhetoric, Writing & Communications.
While I was a student, an instructor from Red River College’s Creative Communications (CreComm) program reached out and asked if I’d start coming in to speak to first-year CreComm students about personal branding, blogging, and the importance of social media.
(If you know me, you know I’ve been publishing content online since 2002, aka the “pre social media era” and grew up immersed in how content has changed online.)
I was 21, a brand new university student, and suddenly I’d gone from feeling like a stupid nobody, to someone my peers and influencers in my community were looking to for inspiration and guidance.
I graduated with almost straight A’s (turns out I suck at Economics and at writing papers in AP style compared to the MLA style I was used to) and got a job working at a large, established marketing firm right out of university.
I should have been happy… but I wasn’t.
I still struggled with anxiety and, now, a heaping dose of Impostor Syndrome, and I had a hard time fitting into my role.
I spent the next few years jumping from job to job, never finding a fit and butting up against rules that didn't make sense, processes that felt outdated, and a lack of agency and creative control over my deliverables and workday.
Around this time I picked up a small freelance copywriting contract. It wasn’t much, just a few blogs a month for a small amount of money, but the idea that I could make money on the side of my 9-5 was like a wake up call.
I said as much to my boyfriend (now husband) and he said: “You know, you could do this for a living if you wanted.”
At the time I shrugged him off; I couldn’t imagine myself leaving the safety and comfort of a reliable paycheck.
“Give it a year and see how it goes” he said “pick up a few more contracts and see how it feels.”
So that’s what I did… and within a year I was making more money freelancing than I was at my 9-5.
I started working for myself that summer and I’ve never looked back since.

(I got a tattoo of the Propagandhi lyric on my arm to celebrate my 1st full year as a business owner, and to remind myself of how far I've come.)
Starting Starling
I managed things by myself for the first few months, but after landing what felt (at the time) like a huge contract with a sales consulting firm based out of New York, I realized that I needed to bring on supports; I couldn’t scale this on my own anymore.
I started bringing on team members to support the workload I’d built and realized that freelancing as “Alyson Shane” wasn’t going to cut it if the people my clients were talking to day-to-day weren’t me.
Why “Starling” Social?
It wasn’t that hard to figure out what I wanted to call my agency.
I’ve always been attracted to starlings. They’re a beautiful, interesting bird, and “murmurations of starlings” - the name for when large groups of the birds fly in mesmerizing patterns through the sky - is one of my favourite expressions.
Starlings are songbirds, and mimics. In addition to their stunning performances in the sky, starling’s are known for being able to mimic sounds, other animals… even humans!
As a marketing agency, our goal is to “mimic” our client’s brands and sound like them, so the link between the bird, and the agency, fell naturally into place.
Building Out Processes
I never went to business school. Heck, I’m a digital marketer who never even studied marketing!
Everything I know has been self-taught, either through hands-on experience or by consuming as much material about a subject as I can.
I taught myself to build out processes to keep my fully remote team connected and productive
(this was in the pre-COVID era when being a fully remote business was less common)
and I’ve invested heavily in training sessions like one I did with Hatch London where I spent three intense days learning the ins and outs of building successful Facebook (Meta) Ads campaigns.
I’ve gone through startup accelerators like YCombinator’s Startup School to learn business strategies and how to think strategically about managing a small, agile, and nimble team without investing in too much overhead and developing systems
I’m also a voracious reader and have an intimidatingly long RSS Feed of websites, blogs, and resources that I check every day so I can stay at the top of my game.
I also curate and write Starling Social’s weekly digital marketing newsletter every week as a way of keeping myself accountable and keeping my skills as sharp as possible.
(If you want to subscribe to that, you can do so here.)
Identifying Differentiators
Let’s be real: in a city where the CreComm program, alone, graduates hundreds of students a year, it sometimes feels like you can’t turn a corner without bumping into another digital marketer or agency owner.
In a city like Winnipeg, you really have to lean into what makes you different - luckily I’ve got heaps of that in spades!
It took me longer than I’d like to start leaning into these differentiators (hello, Impostor Syndrome) but some of the things we bring to the table include:
- My 22 years’ experience publishing content online. I started publishing in the pre-MySpace era (hello, Geocities!) and have hands-on experience crafting content, telling stories, and using every social network as it’s evolved to understand how they work together, and what makes them different.
- My degree in Rhetoric, Writing & Communications. Unlike a lot of my peers, I studied persuasive language, so I have an academic-level understanding of how humans communicate, how we do it differently across different mediums, and how it’s changed over thousands of years.
- I’m a writer. In my view, this is the biggest competitive advantage I have as a marketer. I love writing and do it for fun, and because of my experience I’m a fast, adept, and efficient writer. This also means I hold my team to an extremely high standard when it comes to the content we create for our clients.
Making It Work
Building a successful agency is more than a clever name and a great tech stack - you have to constantly work at it and find new ways to learn, grow, and build connections.
I say this all the time, but the main reason that I was able to scale Starling Social as quickly as I did was because I was a “big fish in a small pond” - I practically lived on Winnipeg Twitter, building connections and making sure people knew who I was, and I blogged regularly and used my writing skills to publish useful how-to articles, guides, and strategies that reinforced me as a subject matter expert.
To date, over 90% of Starling Social’s local business has been referral business, and most of our national and international clients have also come from connections I made at conferences, online, or through friends-of-friends who’ve referred us.
Sure, I have a sales partner who helps generate leads for me, but that business is a drop in the bucket compared to the work we’ve done thanks to good old-fashioned personal branding and networking.
I also do a ton of public speaking (I average about one talk, webinar, or podcast interview per month) which not only keeps me fresh, but also allows me to empower others and share the knowledge I’ve built over my decades publishing online, and my almost-decade working in this industry.

Teamwork Makes the Dream Work*
All this being said, my efforts wouldn’t mean much if I didn’t have a team of incredible humans behind me.
The talented, driven, and creative people at Starling Social handle the day-to-day interactions with our clients so I can do all the fun stuff I just outlined above.
I’ve learned to lean on my team and to make sure that they always feel like they can lean on me, too.
I take what I do seriously for myself and my clients, of course, but mostly I put in effort for them. I want them to feel confident and secure in my leadership, and to know I’ve always got their backs.
(I often say “my job is to make sales, close leads, and eat sh*t so you guys don’t have to.”)
One of my tenets is “if it’s not written down, it doesn’t exist” and as a writer this is one of the things that sets me apart from other agencies: I have extremely well-documented, repeatable processes for almost everything we do.
When we need to solve a new problem, I get down in the trenches with my team and spend time developing how-to guides that they can use and come back to - this eliminates guesswork, helps them be more efficient, and ensures consistently high-quality output whether we’re in the same room or not.
I don’t just do this because I’m an A-Type person; I want to empower my team to do their best work, and they’re less likely to succeed if they’re muddling through a problem, or constantly asking me for advice on how to do something.
This approach also shows my team how committed I am to their success, which (as I said above) is the most important thing to me.
* Sorry/not sorry to Alicia who hears me say this like every other day, haha.
What’s Next?
Looking ahead, I’m excited about what’s to come.
I feel like I’m hitting a stride with my business, and that Starling Social is poised for even more growth and to partner on some impactful and important projects.
Starling Social has won multiple awards, I've personally won awards for my community impact through pro bono work we do, and we regularly receive glowing testimonials and feedback from our happy clients.
I get to work with friends (and clients who feel like they’re friends), do creative work that I enjoy, and build a life for myself and the people who work for me that allows us to (mostly) have a healthy work/life balance, take trips, and soak up the best of what our city and community has to offer.
I don’t know what the future holds, but from here it’s looking brighter than ever.
Cheers to 10 years, and to many, many more!
Show Your E-commerce Store Some Love: Optimizing for Valentine's Day Conversions
Love is in the air, and what better way to celebrate capitalism… wait, we mean love… than buying a gift for your sweetheart this Valentine's Day.
But seriously, if you have an e-commerce store, the sales potential is high this month, so it’s crucial to understand the importance of optimizing your website for shoppers. Love is a potent drug, and if your customers’ love language is gifts, these tips will help maximize your conversion rates and boost those holiday sales.
To make sure they choose your store over competitors, website optimization is key. This involves optimizing everything from product descriptions and images to checkout processes and load times. In this blog, we’ve put together our best tips for optimizing your conversions this Valentine’s Day.
Valentine’s Day Shoppers: Who Are They?
No, it’s not “everyone.” Understanding the diverse demographics of Valentine’s Day shoppers is the first step toward effective targeting. Dive into the data to identify age groups, preferences, and buying behaviours. Are your customers predominantly young couples, long-time partners, or individuals celebrating self-love?
Deliver personalized experiences by segmenting your audience. Create customer personas based on data insights, ensuring your marketing efforts resonate with each segment. Tailor your messaging and product offerings to cater to the specific needs and preferences of different audience groups.
Let’s say, for example, you are selling candles. Pitching a romantic candle-lit evening isn’t going to “light the fire” of a single person celebrating self-love, but embracing the importance of self-care and filling the room with a scent you love might tickle their fancy.
That’s why knowing the intent behind your customers' purchases is a powerful tool. Leverage past data to identify popular products and create targeted promotions. Anticipate the needs and desires of your audience, offering solutions that go beyond the conventional Valentine's Day gifts.
Did we lose you in the data section? Don’t worry, creative entrepreneurs, it gets more fun.
Showcase Valentine's Day-Themed Products and Promotions on Your Website
Create a Valentine’s Day Gift Guide
These are great because they can be used everywhere: website, social media ads, organic social, email campaigns — we love content we can repurpose. If you’re really tech-savvy, you can make a quiz on your site to “find the perfect gift for your sweetheart.” Organize your products into categories that align with different relationship stages or preferences. Make the shopping experience effortless by guiding customers through thoughtful selections for their loved ones.
Curate a Valentine’s Day Product Display
Optimize your website's layout for Valentine's Day. Feature themed product displays on the homepage to grab visitors’ attention the second they land on your site. Remember, we are visual creatures, so use eye-catching images and strategically placed banners to showcase your selection of Valentine’s Day goods.
Promotional Offers and Limited-Time Discounts
Urgency sells. It personally sells us all the time —even when we’re the ones writing the copy for it! Consider limited-time discounts, buy-one-get-one-free deals, or exclusive bundles. Create a sense of urgency to drive immediate action, tapping into the time-sensitive nature of Valentine’s Day shopping.
Craft Compelling Copy and Visuals to Engage Shoppers

Tell a Story
Your product descriptions aren't just about features – they're an invitation to connect with your audience. Emphasize the personal touch of your offerings and craft your descriptions like you're sharing a story. Show how your product goes beyond being an item. Explain how your product will contribute to a meaningful moment. Remind them that buying from you isn't just a transaction: it's a deliberate choice for a thoughtful, personal connection.
Add The Theme to Your Site
When people land on your site, we want them to have a clear understanding that it’s Valentine’s Day and they are in the right place for shopping.
Think about filming snappy video snippets, giving a glimpse of your products in authentic, real-life settings. Set the scene on your site with a design that resonates with the vibes of Valentine's Day (or Galentine’s, Palentine’s etc. — segmentation, remember!).
Streamline the Checkout Process
Keep it simple. A seamless checkout process is crucial for converting potential buyers into customers. Any inconvenience can cause a shopper to click away.
- Simplify your checkout forms and reduce unnecessary steps
- Offer multiple payment options to cater to diverse preferences
- Prioritize mobile optimization to accommodate shoppers on various devices
Leverage Email Marketing and Social Media Campaigns to Drive Traffic and Conversions
Email Marketing Strategies for Valentine’s Day Promotions
Lucky for you, our team sends a lot of emails for our clients. Because of that, we have a plethora of information on the best practices for email marketing.
You’ll want engaging and personalized email campaigns that highlight your Valentine’s Day offers. We also have a blog on 50+ Valentine’s Day Subject Lines for E-Commerce Sales to help you out! The Coles notes are:
- Interesting visuals
- Targeted messaging
- Clear calls-to-action
Paid Social Media Advertising Tactics for Ecommerce Success
Paid ads work — if you do them correctly. If this seems way out of the realm of possibility for you, we can definitely help, but if you are handling this yourself, here are a few tips:
- You have about one-second to catch peoples’ attention with ads, so make sure you are using compelling images/video and copy to make your viewers stop their scroll.
- Take advantage of targeted ad campaigns based on demographic data and user interests.
- Utilize A/B testing to get the highest return on investment
- Choose the right platforms to reach your target audience
- You can run multiple ads to reach different audience segments
- Monitor and adjust your ads based on their performance
Organic Social Media Tactics
Unfortunately, the best practices for each platform are constantly changing (subscribe to our newsletter here for the latest updates), but using organic social media is a great way to reach people who are already interested in your product.
The same principles apply to organic social media as paid ads, but you have a little more freedom. There’s more time, opportunity and a chance to give more information.
Use the features each platform offers to please the algorithm gods. On Instagram, you can use the countdown feature for your new launch, post carousels of your Valentine’s Day gift guide, make a Reel with a trending sound, or tell a story about how this product or service will add to your special day. People want to buy from YOU, not a faceless business.
TikTok is all about authenticity and trends. You will be able to find a trend you can make work for your business and hop on it. No, it doesn’t need to be dancing. Skip the videos of different images of your products or service and opt into sharing a story or a behind-the-scenes look at your biz.
On Facebook, you want to use attractive images, videos and a clear call to action. While you can include a link, Facebook will de-prioritize posts that lead away from the platform. A little workaround for that is pinning a post with a link (or several) to your promoted products and leave the link off other posts.
Threads focuses on community building and test-based content, so start meaningful conversations with influencers of your target audience to see the best return.
General posting ideas for these and other platforms: promote products/services, share expertise or helpful content related to Valentine’s Day, repost user-generated content, work with influencers, and engage with the audience through contests and interactive content.
Remember, the key is to create a seamless experience between your email marketing campaigns and social media presence. By integrating both channels effectively, you can drive traffic to your website or landing pages while increasing conversions.
Analyze Data and Making Adjustments to Improve Conversion Rates Post-Valentine’s Day
E-commerce Analytics Post-Valentine’s Day Optimizations
Prepare for next year! After the love-filled rush, dive into analytics to assess the performance of your Valentine's Day campaigns. Identify top-performing products, successful marketing channels, and areas for improvement. Analyze the results to understand what resonates best with your audience and apply these insights for ongoing optimization.
P.S. We do this for you at the end of each ad campaign!
Valentine’s Day promotions isn’t just about selling, it's about connecting with your customers. Keep it real. Your customers aren't just transactions, they're individuals with specific needs. Be authentic in your marketing.
If you don’t feel ready for the Valentine’s Day rush, we can be your support. Contact us here to get started on your next campaign.
15 Must-Know Email Marketing Stats for 2024 - And How To Use Them To Your Advantage
- by Alicia Kurz, Sr. Account Manager
Written by Alicia Kurz, Sr. Account Manager
With new apps, endless updates, and a never-ending stream of information on marketing your business, one tool continues to stand out: email marketing.
Even in 2024, email marketing continues to be an essential part of any strategy for businesses looking to connect with their audience.
Need convincing? Let's explore the pivotal stats shaping the email marketing landscape this coming year.
General Stats
Worldwide Email Users Are Expected to Increase to 4.6 Billion by 2025
As it stands, there will be over 4.3 billion people who use email in 2023.
This stat is only expected to increase in the coming years, with email connectivity increasing to 4.6 billion by 2025.
347.3 Billion Emails are Sent and Received Every Day
This number is projected to increase to 361.6 billion in 2024.
Experts used to think that email would fall by the wayside as apps like WhatsApp and Slack emerged onto the scene, but with worldwide internet accessibility increasing overall, we are seeing quite the opposite.
Open Rate Stats
Personalized Emails Have An 82% Higher Open Rate Than Generic Emails
Personalization used to be a tactic that seemed more optional than essential, but the stats show that in order to stay competitive, businesses need to lean into personalizing their emails.
Welcome Emails Have An Open Rate of 91.43%
If you don’t have welcome emails set up yet, then stop what you’re doing and get started. These emails grab attention with the highest open rate and deliver a high payoff with an average click-through rate 4 times higher than your regular marketing email at 26.9%.

The Average Open Rate For Email Campaigns is 21.33%
This varies depending on your industry and target audience, but a “good” email open rate should fall between 17-28%.
The industries with the highest open rates are government, religious, hobbies and marketing.
Engagement Stats
60% of Consumers Have Completed a Purchase Through Marketing Emails
A great email marketing campaign captures attention and drives action. The latest stats show consumers spend 138% more when influenced by effective email marketing strategies.
77% of Marketers Have Seen An Increase In Email Engagement Over The Last 12 Months
Remember, this isn’t a guarantee with email marketing campaigns. You still need to use best practices like segmentation, strong subject lines, eye-catching images, clear and concise copy and a strong call to action. You aren’t the only one hitting your target’s inbox, so make sure you stand out.
64% of People Decide Whether To Open Or Delete Emails Based On Subject Lines
Grab your recipient's attention with a catchy subject line, or it will end up in the trash — or worse, they’ll report it as spam.
Mondays And Tuesdays Are The Best Days To Send Marketing Emails
The highest open rate of emails is on Mondays, but the highest click-through rate happens on Tuesdays.
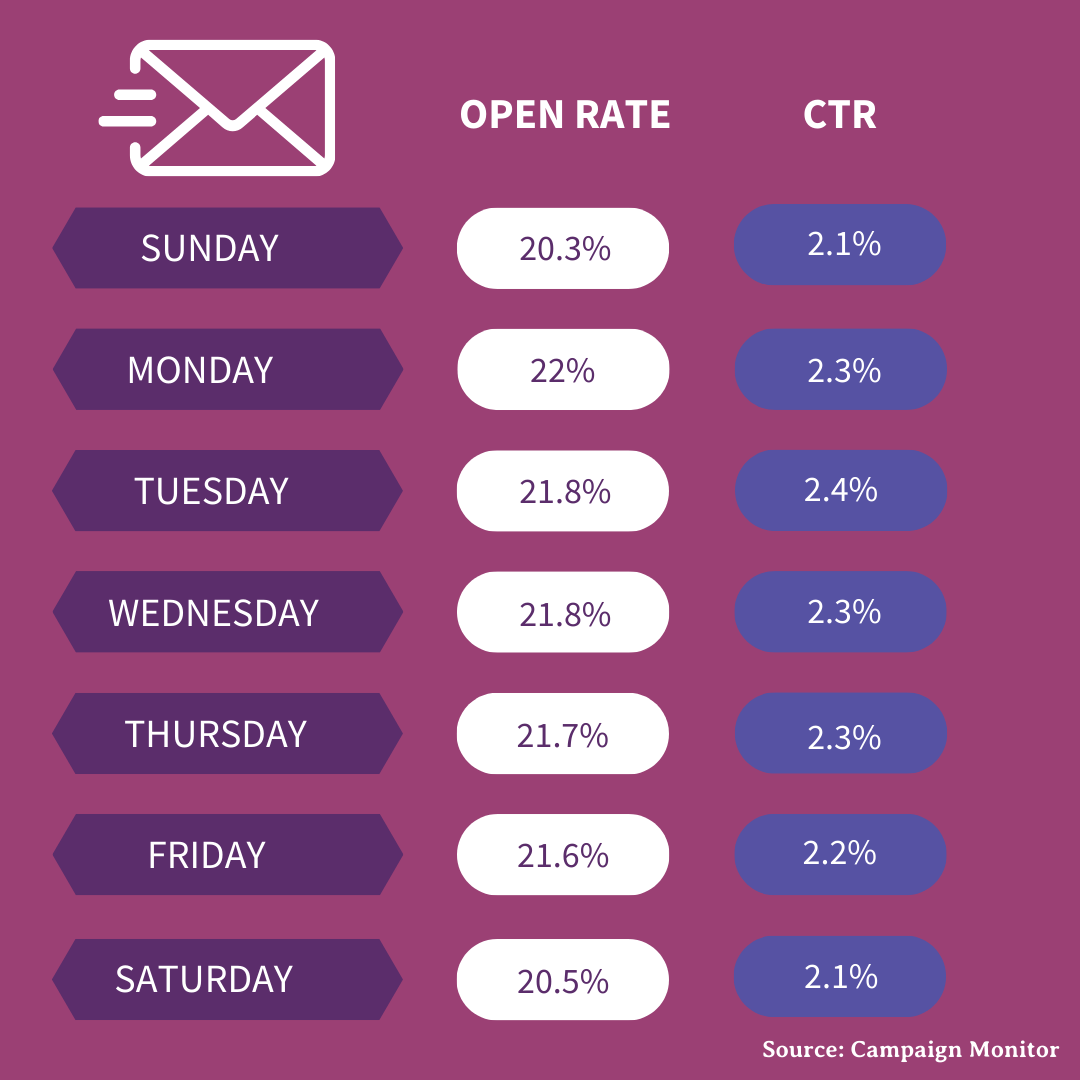
The Best Time To Send An Email Is Between 9 am and 11 am
If you’re not a morning person, the best alternative is between 1 pm and 2 pm.
Marketing Emails Have A ROI of $36 For Every $1 Spent
The return on investment for email marketing is higher than any other channel.
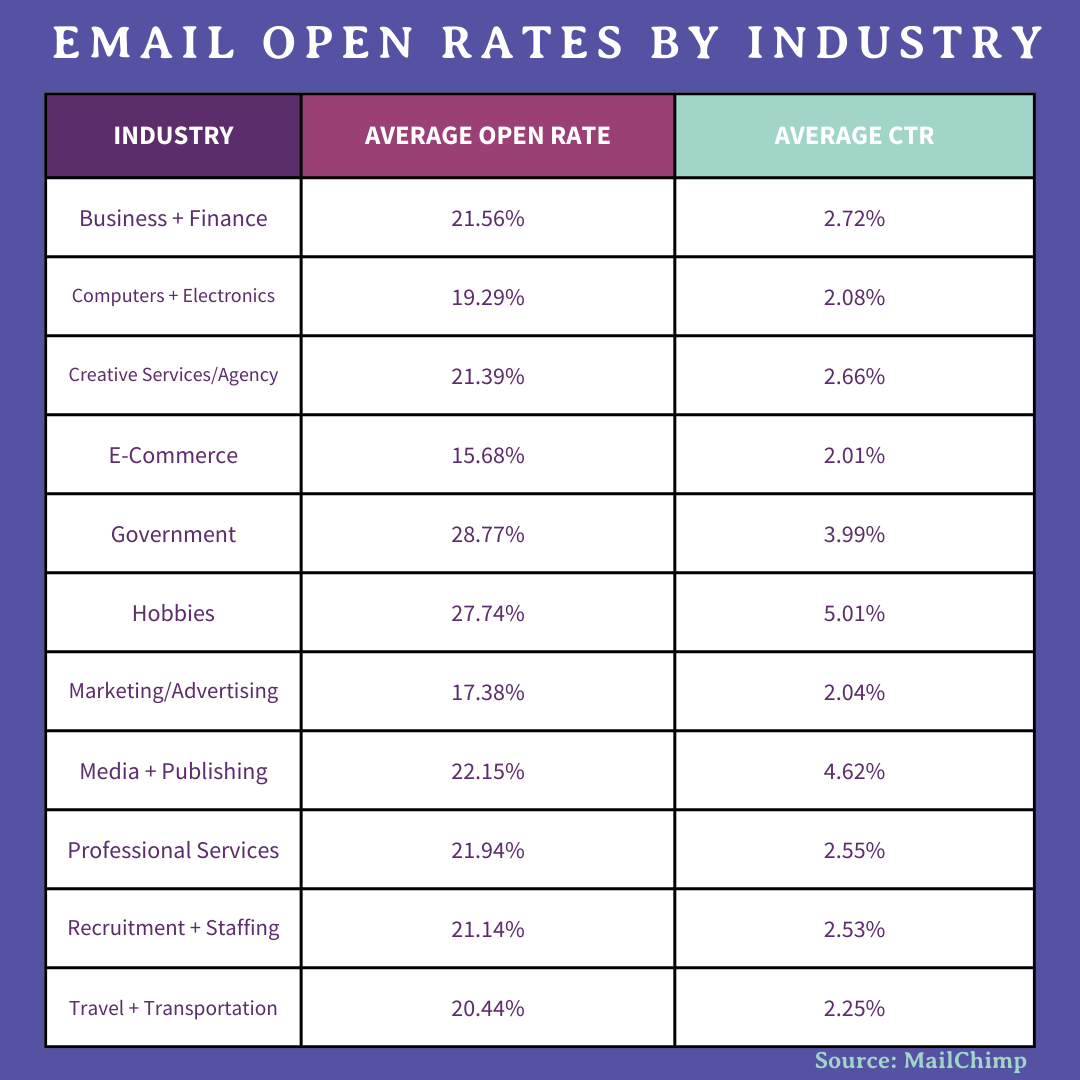
Stats like these are great, but if you don’t understand how to use them, how will you improve your next marketing campaign? That’s why tracking your success is so important.
If you’ve ever been a client of Starling’s, you know that each month we’ll send you a hand-written report with stats like these and actionable insights we implement moving forward.
Our newsletter reports share details like open rates, click-through rates, and conversion rates, so you know just how well your emails are (or aren’t) performing. Paying attention to this data helps you tweak your content, timing, and targeting to get the most out of your campaigns.
6 Ways To Optimize Your Campaigns
Set up Automated Email Campaigns
These perform the best because they are timely, relevant and personalized to your subscribers.
Email Triggers:
Welcome
Welcome emails are set up so people will receive an email right after they hit subscribe. It’s common to offer new subscribers small coupon codes because they have a higher chance of converting — you already know they want to know more about your product!
New Customer
Send a thank you message to people who made a purchase. It's a nice gesture, and you can offer things like customer service to encourage a positive buying experience.
Abandoned Cart
Your product has already tempted these potential customers, which is why open rates for abandoned cart emails are over 48%! Why not send them a reminder?
Browse History
Like abandoned carts, these emails are sent to people who viewed products on your site but weren’t ready to check out. It’s a bit of an aggressive approach IMO — like a digital pushy salesperson — but they can lead to a purchase!
Customer Winbacks
These emails are sent to people who have shopped with you but haven’t engaged in a while. Typically, selling to someone who has already purchased from you is easier. Companies often offer discount codes to return or let them know about a sale on a product they’ve already purchased.
Segment And Personalize Your Email Lists
It’s the same rule for social media followers and email subscribers. Quality over quantity. Not everyone on your list will be interested in the same generic content. Segmented and targeted emails generate 58% of all revenue.
Make sure you add people’s names and segment based on things like location - ex “windchill special for my Winnipeg followers!”
Pro-Tip: Consumers are tuned in and hold lofty expectations regarding personalization. Make the extra effort to ensure your personalization techniques meet the mark—and then double-check to be absolutely certain.
It’s important to use the segmenting tools along with your personalization efforts to avoid annoying your customer with things like:
- Expired offers
- Wrong location offers
- Already purchase promotions
- Recommendations that don’t match their interests
Optimize For Mobile And Desktop
You want to make sure your potential customers are having an easy experience. Optimized emails don’t give any reason for people to click out of your content.
Avoid Sending Too Many Emails
Engagement drops with each additional newsletter sent per week.
Create Dark Mode Compatible Emails
35% of email opens were tracked using dark mode in 2022. Making emails dark mode-friendly is allows a more comfortable reading experience, cutting down on blue light and screen glare.
Optimize for dark mode by using transparent PNGs, adding translucent outlines to dark text PNGs, and always test emails before hitting send.
Make sure your emails look good in both light and dark modes, keeping things accessible and aligned with what your subscribers prefer for a smooth experience.
Add Interactive Elements
Interactive emails boost engagement and conversions by creating a more personalized experience.
Using elements like countdown timers, GIFs, ratings, quizzes, surveys, videos, and polls encourages active participation, leading to higher open rates and engagement. With increased attention and engagement, interactive emails drive higher click-through rates, leading to increased conversions.
We love an email marketing campaign because it offers a direct and personalized way to engage with your audience, build relationships, and drive conversions.
With the power of well-crafted email campaigns, businesses like yours can effectively reach their target market and achieve their marketing goals.
As time and technology evolve, there will be advancements in email marketing automation tools that streamline processes and improve efficiency.
But it’s important not to overlook the human touch in crafting compelling email copy that resonates with your recipients. That’s where we can help.
Get in touch with us here to talk about your next email marketing campaign, and subscribe to our weekly newsletter with all the news and strategies you need to stay up-to-date with your digital marketing strategy.
10 Ways to Celebrate "Get to Know Your Customers Day" 2024
Get to Know Your Customers Day falls on the third Thursday of each quarter (January, April, July, and October) and is a great opportunity for small businesses to connect with their customers and show their appreciation for their support.
This day recognizes the importance of understanding who your customers are, and what their needs, interests, and preferences are so you can serve them better.
This is a lesser-known special day for small and medium enterprises (SME)s, so today I'll be diving into the history behind the day and sharing tips on how to celebrate the day on social media.
Let’s dive right in:
When is Get to Know Your Customers Day in 2024?
Since it’s a quarterly observation, here are the dates for 2024:
- January 18
- April 18
- July 18
- October 17
(So close to having them all on the 18th!)
The History of Get to Know Your Customers Day
Get to Know Your Customers Day started in 2011 when marketing consultant Lynn B. Johnson created her “Customer Appreciation Month” campaign as a way for businesses to build better relationships with their customers.
How to Celebrate Get to Know Your Customers Day
There are lots of ways to celebrate Get to Know Your Customers Day, including on social media, by sending out surveys, doing customer interviews, and more. Here are a few ideas to get your creative gears turning:
- Create a social media campaign to recognize and thank some of your biggest supporters.
- Share a personalized thank-you message to your social channels or via email.
- Send out a survey to get your customers’ feedback on your products or services.
- Offer discounts, promotional items, free samples, or special offers to celebrate the day and your customers.
- Host a customer appreciation event with free workshops on how to use your products or services.
What to Post on Social Media for Get to Know Your Customers Day
Social media is the easiest way to communicate with your audience and thank your loyal customers, but knowing what to say can feel overwhelming so try using these prompts:
- Share customer stories and how they’ve had a positive impact on your business.
- Publish polls to gather customer feedback (LinkedIn, Instagram Stories, and Threads are all great for this!)
- Create user-generated content (UGC) by asking customers to share their positive experiences with your brand on social media and tagging you.
- Record a video of yourself delivering a heartfelt “thank you” message.
- Host a Q&A session with team members about the business or topics related to your industry.
- Host a giveaway for customers who share their experiences on social media.
Which Hashtags to Use for Get to Know Your Customers Day
Hashtags are a great way to help your content get discovered on platforms like Instagram and TikTok, so I recommend including these in your posts celebrating the day:
- #GettoKnowYourCustomersDay — 39,291 media
- #CustomerAppreciationDay — 65,791 media
- #CustomerAppreciation — 1.6M media
- #CustomerLove — 446,339 media
TikTok
- #GettoKnowYourCustomersDay — 197.6k views
- #CustomerAppreciationDay — 1.1M views
- #CustomerAppreciation — 52.7M views
Benefits of Getting to Know Your Customers
Understanding your customers’ needs is the fastest way to increase customer loyalty and create more products or services that they love.
Getting to know them better also creates more opportunities for you to create personalized experiences that make them feel seen, valued, and appreciated. These kinds of experiences build trust and help turn one-time customers into loyal brand advocates.
On a related note, repeat customers spend an average of 67% more than new customers, so bringing them back helps dramatically increase your revenue!
It also costs 5x more to acquire a new customer than to bring an old one back, so investing in getting to know your customers can have a big financial benefit for your business, too!
How to Get to Know Your Customers (Year-Round!)
We’ve already talked about social media, surveys, and email marketing as ways to get to know your customers better, so let’s take a look at a few other ways you can learn more about them:
Read and Respond to Reviews
Reading and replying to reviews - whether on Google, Yelp, Amazon, Etsy, or anywhere else - is important.
Replying to customer views shows that you’re paying attention to their feedback and experiences with your brand, but it can also shed light on issues your customers are having so you can fix them as soon as possible.
Replying to reviews also humanizes your brand, builds trust, and shows that you’re committed to offering the best possible experience.
Important Tip for Replying to Reviews
Never reply to a negative review with a rude or dismissive comment! Always follow these four rules:
- Acknowledge the person who left the review. Say “Thanks [person’s name] for taking the time to share your experience.”
- Apologize for their experience. Say “we’re sorry to hear you had issues with [insert issue here]”
- State what you’re doing to make it right. Say “we’re working to resolve it by [insert what you’re doing]”
- Move the conversation offline. Say “If you’d like to chat about this further, you can reach us [add the email or url for your contact form]”
Personalize Deals and Discounts
Customers are people, and people want to feel appreciated.
That’s why offering discounts for their birthday, anniversary, and based on prior purchases is an excellent way to keep customers coming back and learning about their buying patterns and preferences.
Personalization also helps a customer feel like they’re valued instead of being just a number to your brand. Make sure to include their name in the subject line and at the top of the email, and to emphasize how much you appreciate their business in the body text of the offer.
Look at Website Data
This is such an overlooked way to learn more about your customers! Take a peek under the hood of your Google Analytics (G4) and take note of the following:
- Behavioral data: what keywords did people use to find your site, What paths they took while they were there. Which pages they’re exiting from, and the content they’re most interested in.
- Demographic data: the age, gender, location, and devices customers are using can all provide valuable insights about who’s coming to your website and buying from you.
- Campaign data: which pages are driving leads and sales, how are customers getting from your landing pages to the purchase pages, and more.
Get to Know More About Your Customers in 2024
Understanding your customers matters more than ever, and Get to Know Your Customers Day is the perfect reason to show them how much you appreciate their support and learn about what they like so you can tailor your products and services to their needs.
If you’re looking for more ways to make meaningful connections with your customers through your digital marketing, then drop us a line.